Advanced Bar Operations (TO DO)
For bartenders that are more experienced and already know the basics.
Have you bartended a couple times and getting more comfortable during your shifts? Are you interested to grow to become an SVH and be responsible of the bar? Read how to become an SVH in SVH Operations to read the responsibilities, your advantadges of being an SVH and the proces of becoming one.
- HELP! I ran out of...
- How to change a keg
- How to change the beer tank (TO DO)
- How to change Chocomel Machine
- How to change Coffee Milk
- Advanced Cash Register
- Technical Back End
- Traditions
HELP! I ran out of...
Hubble
In Hubble there are several storage places where things can be found when they run out in the café:
- The back storage
- The storage space behind the kitchen. This is where the bartenders can leave their personal belongings when bartending. Among others, all food reserves, coffee items and almost all drinks have a reserve here.
- Downstairs drinks storage
- This storage is found downstairs going straight left from the elevator. Card access is needed for this storage. This storage is where all of our booze is stored, as well as the big soda and beer keg reserves. The two 1000-Liter beer tanks are also found here.
- Internal Solow
- This storage is found downstairs as well, going right from the elevator. In this storage almost all non-consumable items of Hubble are stored.
| What | Where | Comment |
| Bavaria beer | Dommel |
Mike |
| Bavaria beer (actually) | Downstairs drinks storage | |
| Other beers | Keg fridge in the back |
Place the empty keg in the storage in the back. |
| Soda | Soda fridge in the back | |
| Juice | Back storage | On top of the keg fridge in the back. |
| Booze |
Downstairs drinks storage |
Max 2 bottles per drink behind the bar |
| Wine |
Wine rack in the back |
Next to the coats |
| Lattiz coffee milk/Hot chocolate | Back storage | |
| Receipts | Underneath register Kitchen (top-right near the exit) Internal Solow |
When the orange light on the receipt printer is turned on, then the receipts need to be replaced:
Usually there are new rolls underneath the register, otherwise they need to be grabbed them from the Solow. |
| Snack tray | So Low |
|
| Snacks | Back storage |
Snacks can be found in the freezer in the back storage |
| Sauces | Back storage |
Sauces can be found in the shelf in the back of the back storage |
| Lemon, ginger and mint | Back storage |
Can be found in the Vegetables fridge in the back (third fridge) |
Meteor
In Meteor, most things can be found in the storage upstairs. To access this you will need to take a droplet to unlock the doors.
Before going upstairs, check if there is no more stock in the fridges or freezer in the bar.
| What | Where | Comment |
| Beer |
Keg fridges Walk-in fridge upstairs |
All beers and cider that come in a keg |
| Soda | Walk-in fridge upstairs |
|
| Canned/ bottled beers and SYNC | Walk-in fridge upstairs | |
| Wine | Walk-in fridge upstairs | Red wine isn't in the fridge |
| Booze |
Upstairs storage |
Max 2 bottles per drink behind the bar |
| Coffee stuff |
Upstairs storage |
|
| Ice |
Bar freezer Walk- in freezer upstairs |
|
| Cocktail machine supplies + cocktail bottles |
Bar fridge Behind bar Storage upstairs Walk-in fridge upstairs |
Location depends on whether the ingredient needs to be cooled. |
| Receipts | Underneath register Upstairs storage |
When the orange light on the receipt printer is turned on, then the receipts need to be replaced:
Usually there are new rolls underneath the register, otherwise they need to be grabbed from upstairs. |
| Snack trays | Upstairs storage |
|
| Snacks |
Bar freezer Walk-in freezer upstairs |
Fries are kept in the fridge instead of freezer |
| Sauces | Upstairs storage |
Sauces can be found on a shelf in the back right of the storage |
| Lemon, ginger and mint |
Bar fridge Walk-in fridge upstairs |
|
| Glasses | Upstairs storage |
|
How to change a keg
How to Replace a Keg
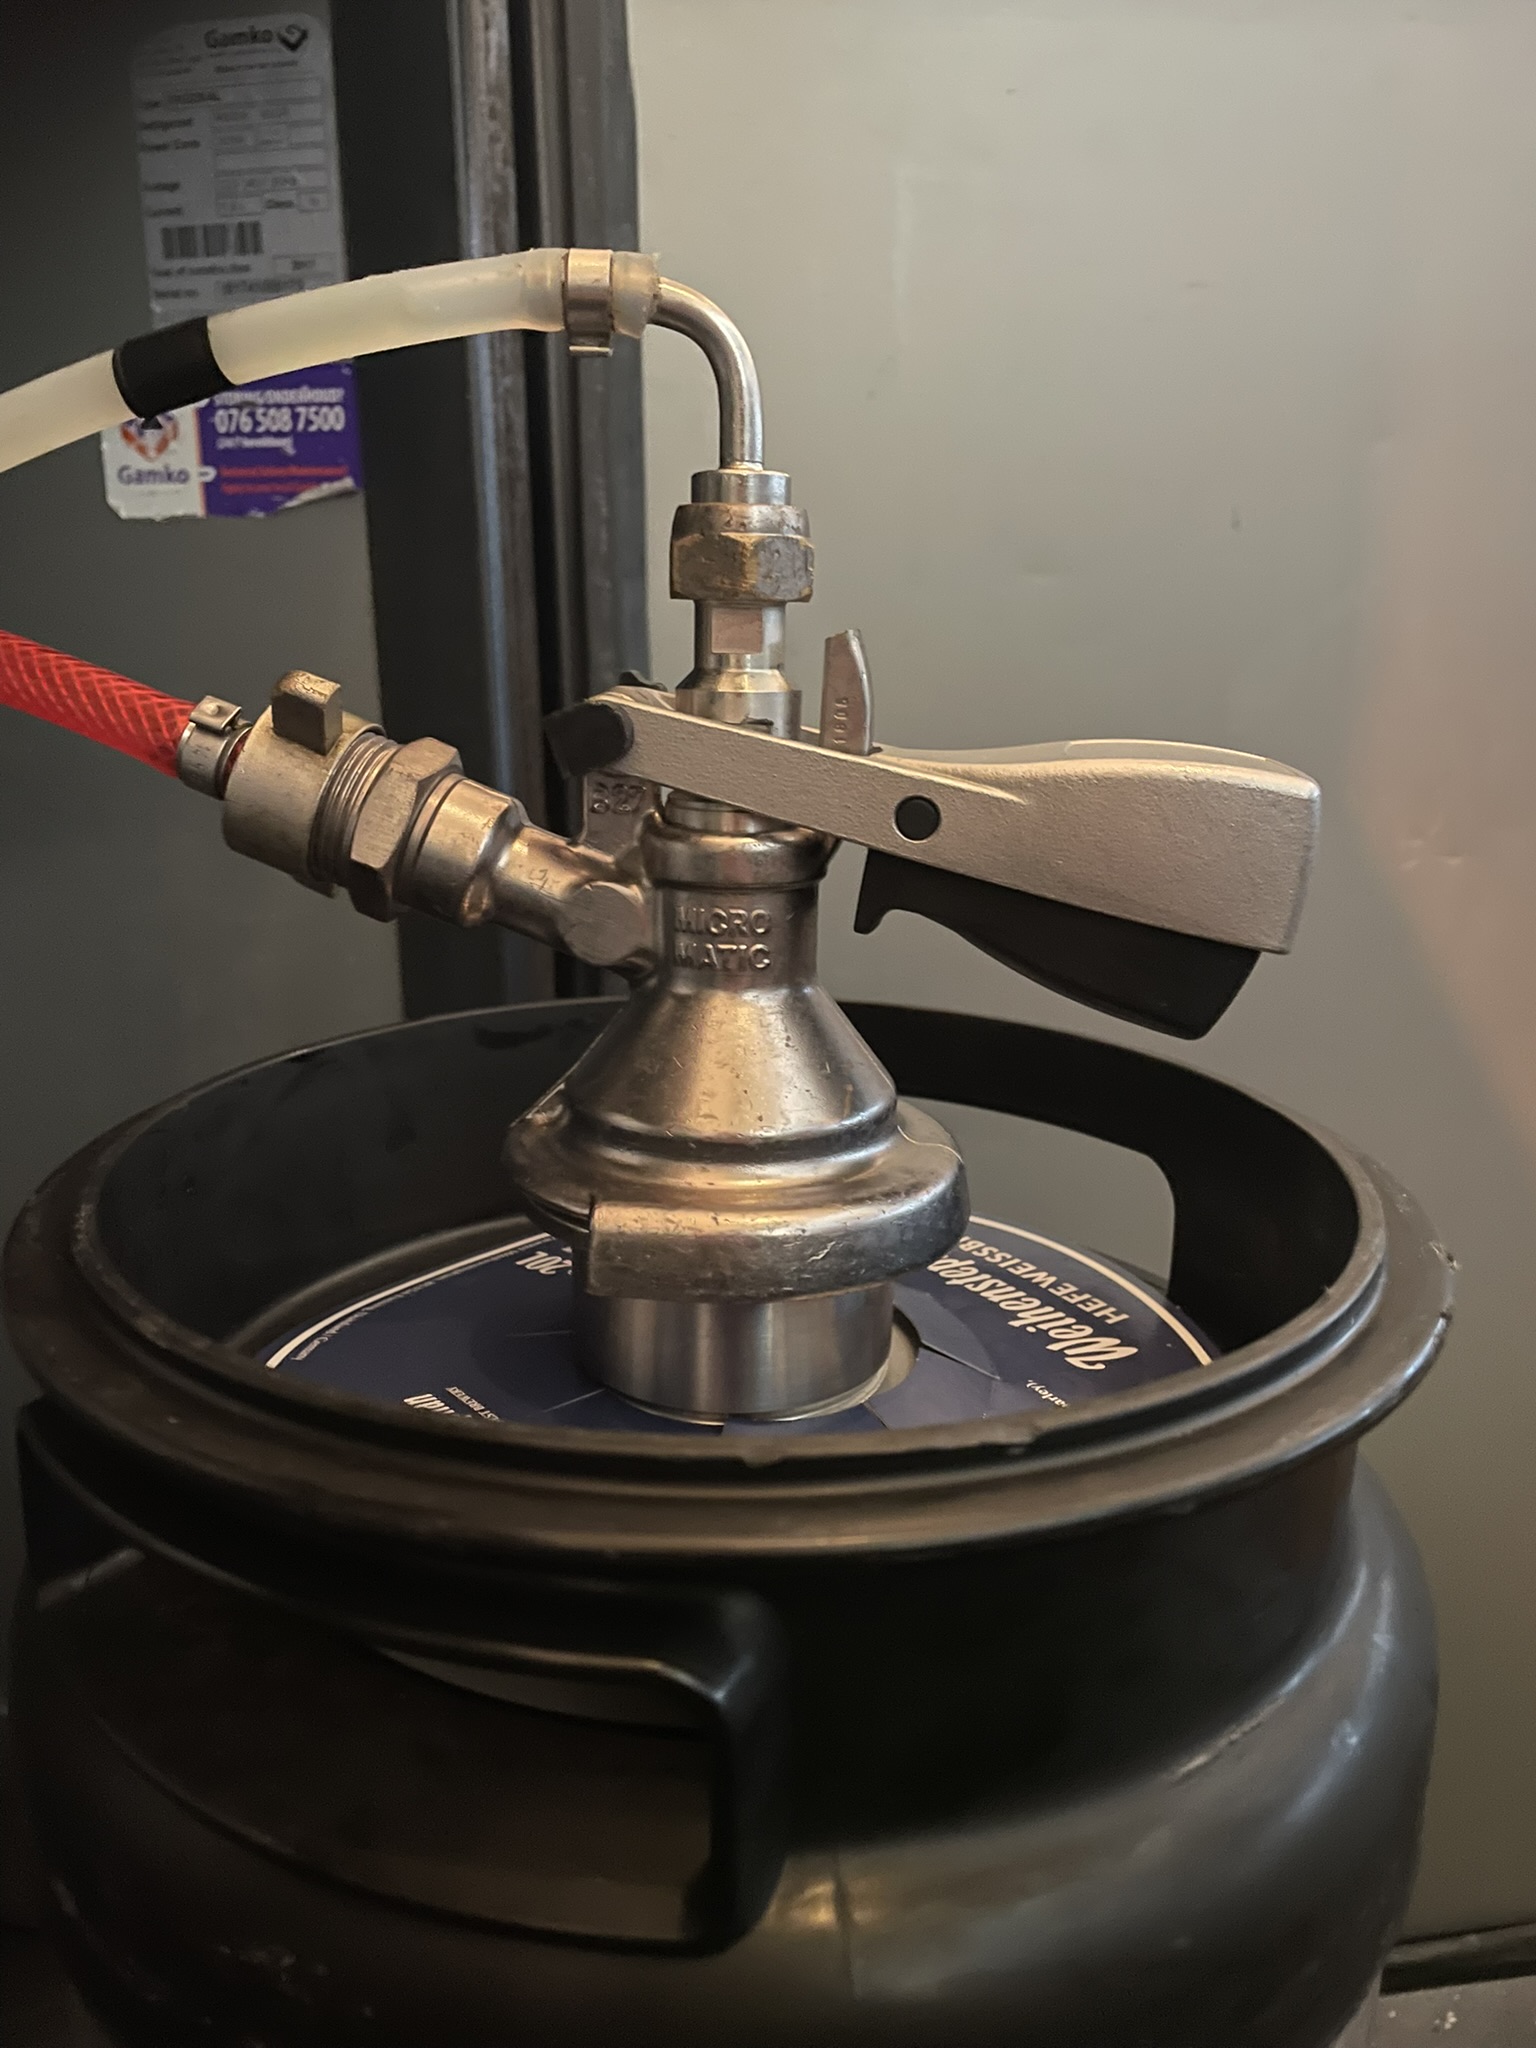
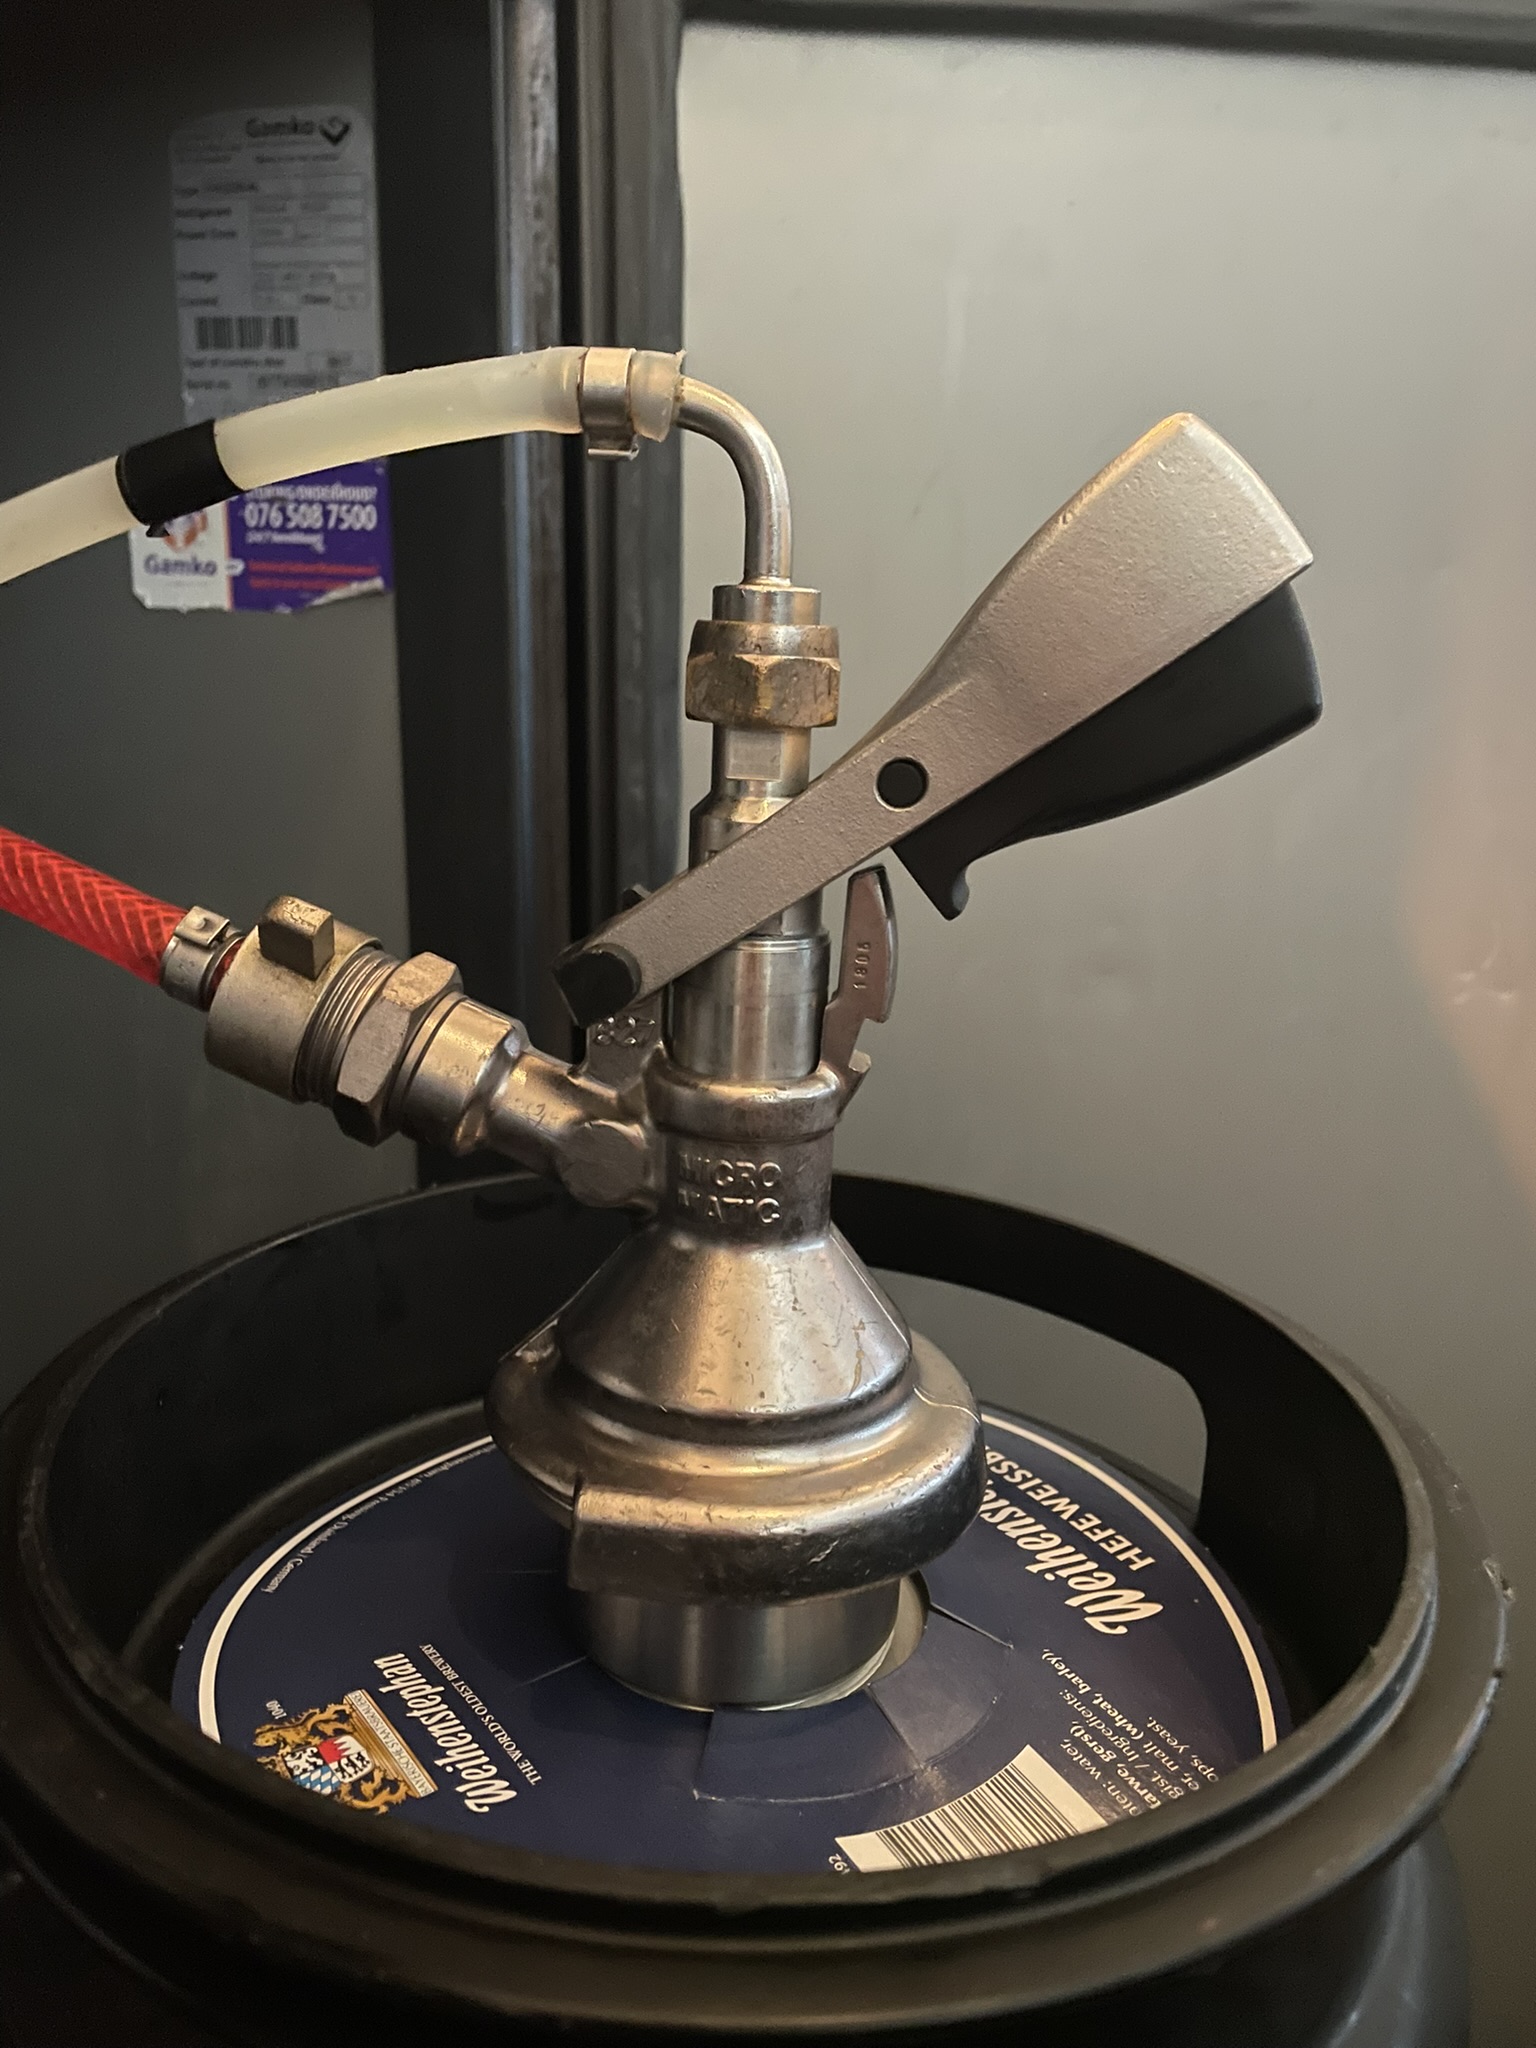
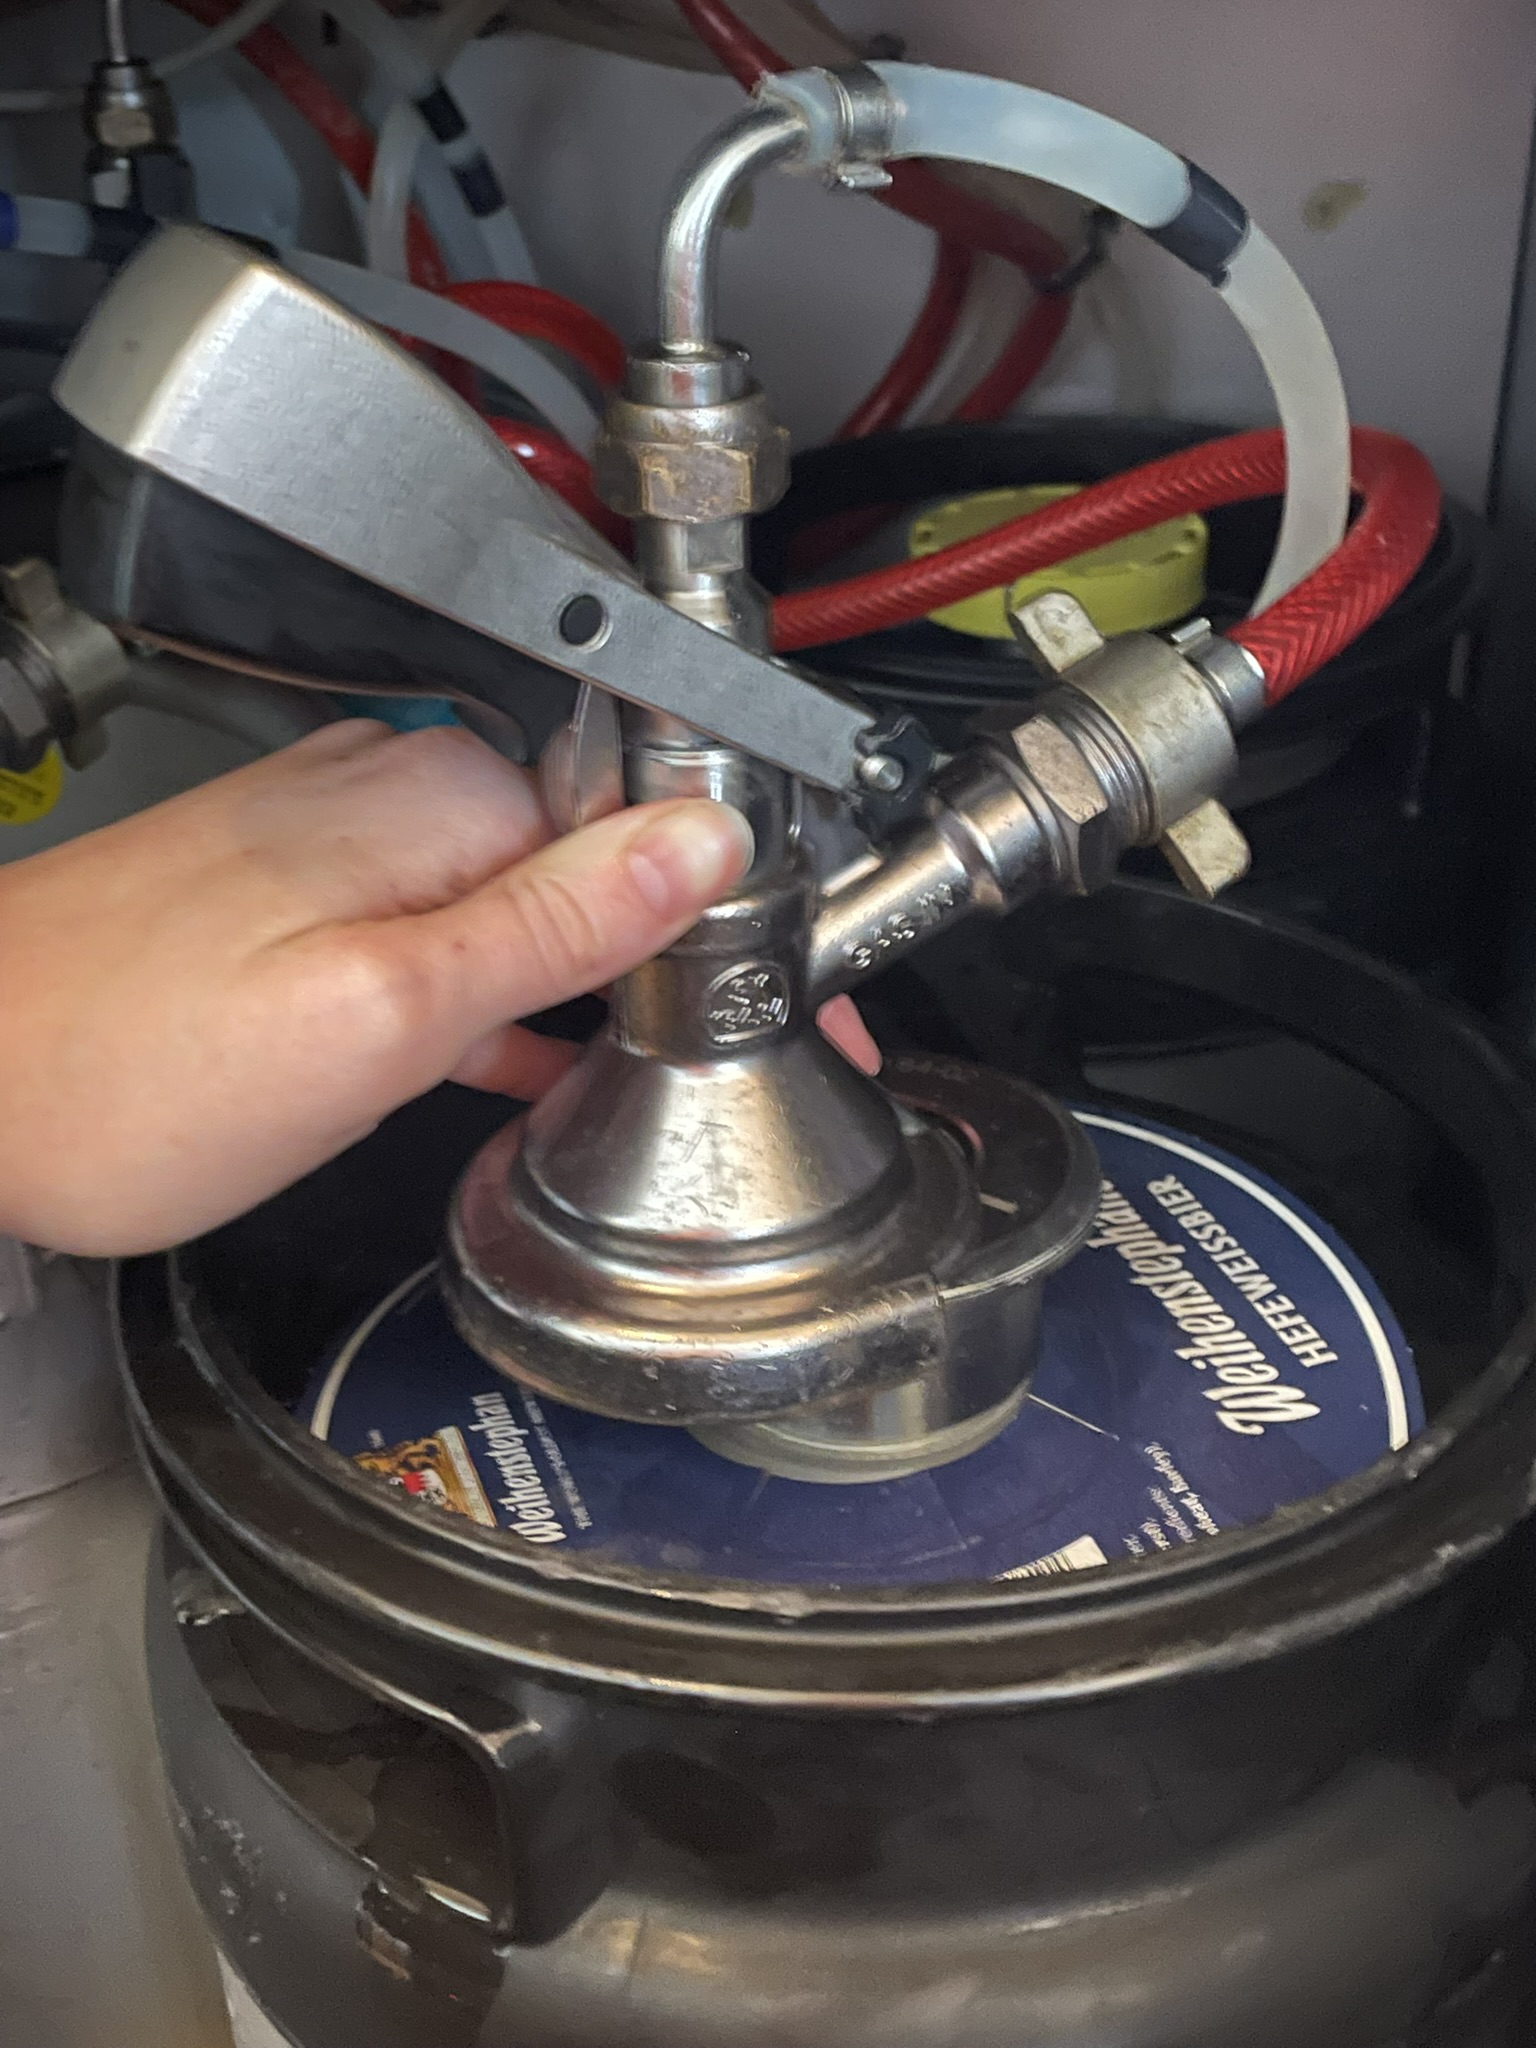
Combi-Slide Type
-
Check if the keg is empty
-
No beer or only foam = likely empty.
-
You can also lift the keg to feel its weight.
-
-
Disconnect the coupler
- Pull the handle up by squeezing it.
- Slide the handle back off the keg. This may take some effort, use both hands and pull towards you for the most force.
-
Put away the empty keg
-
Gently put it aside. Do not shake or throw.
- Put it in the storage (in the back for Hubble, on the container with empty kegs for Meteor)
-
-
Connect full keg
-
Place it upright and remove the protective seal (trow this in the trash).
- Slide the coupler onto the new keg. Make sure the handle stays fully up when doing this.
- Squeeze the handle to push it back down.
- Push the handle down until it clicks and locks in place.
-
-
Check the connection
-
You may hear a soft hiss. Draft briefly to confirm beer flows well.
-
Some things to note:
- The keg or connector may leak some beer. This is okay. If a lot of beer is leaking, you probably did not put the handle fully up.
- Witte trappist kegs should be stored upside down, this is to prevent sediment.
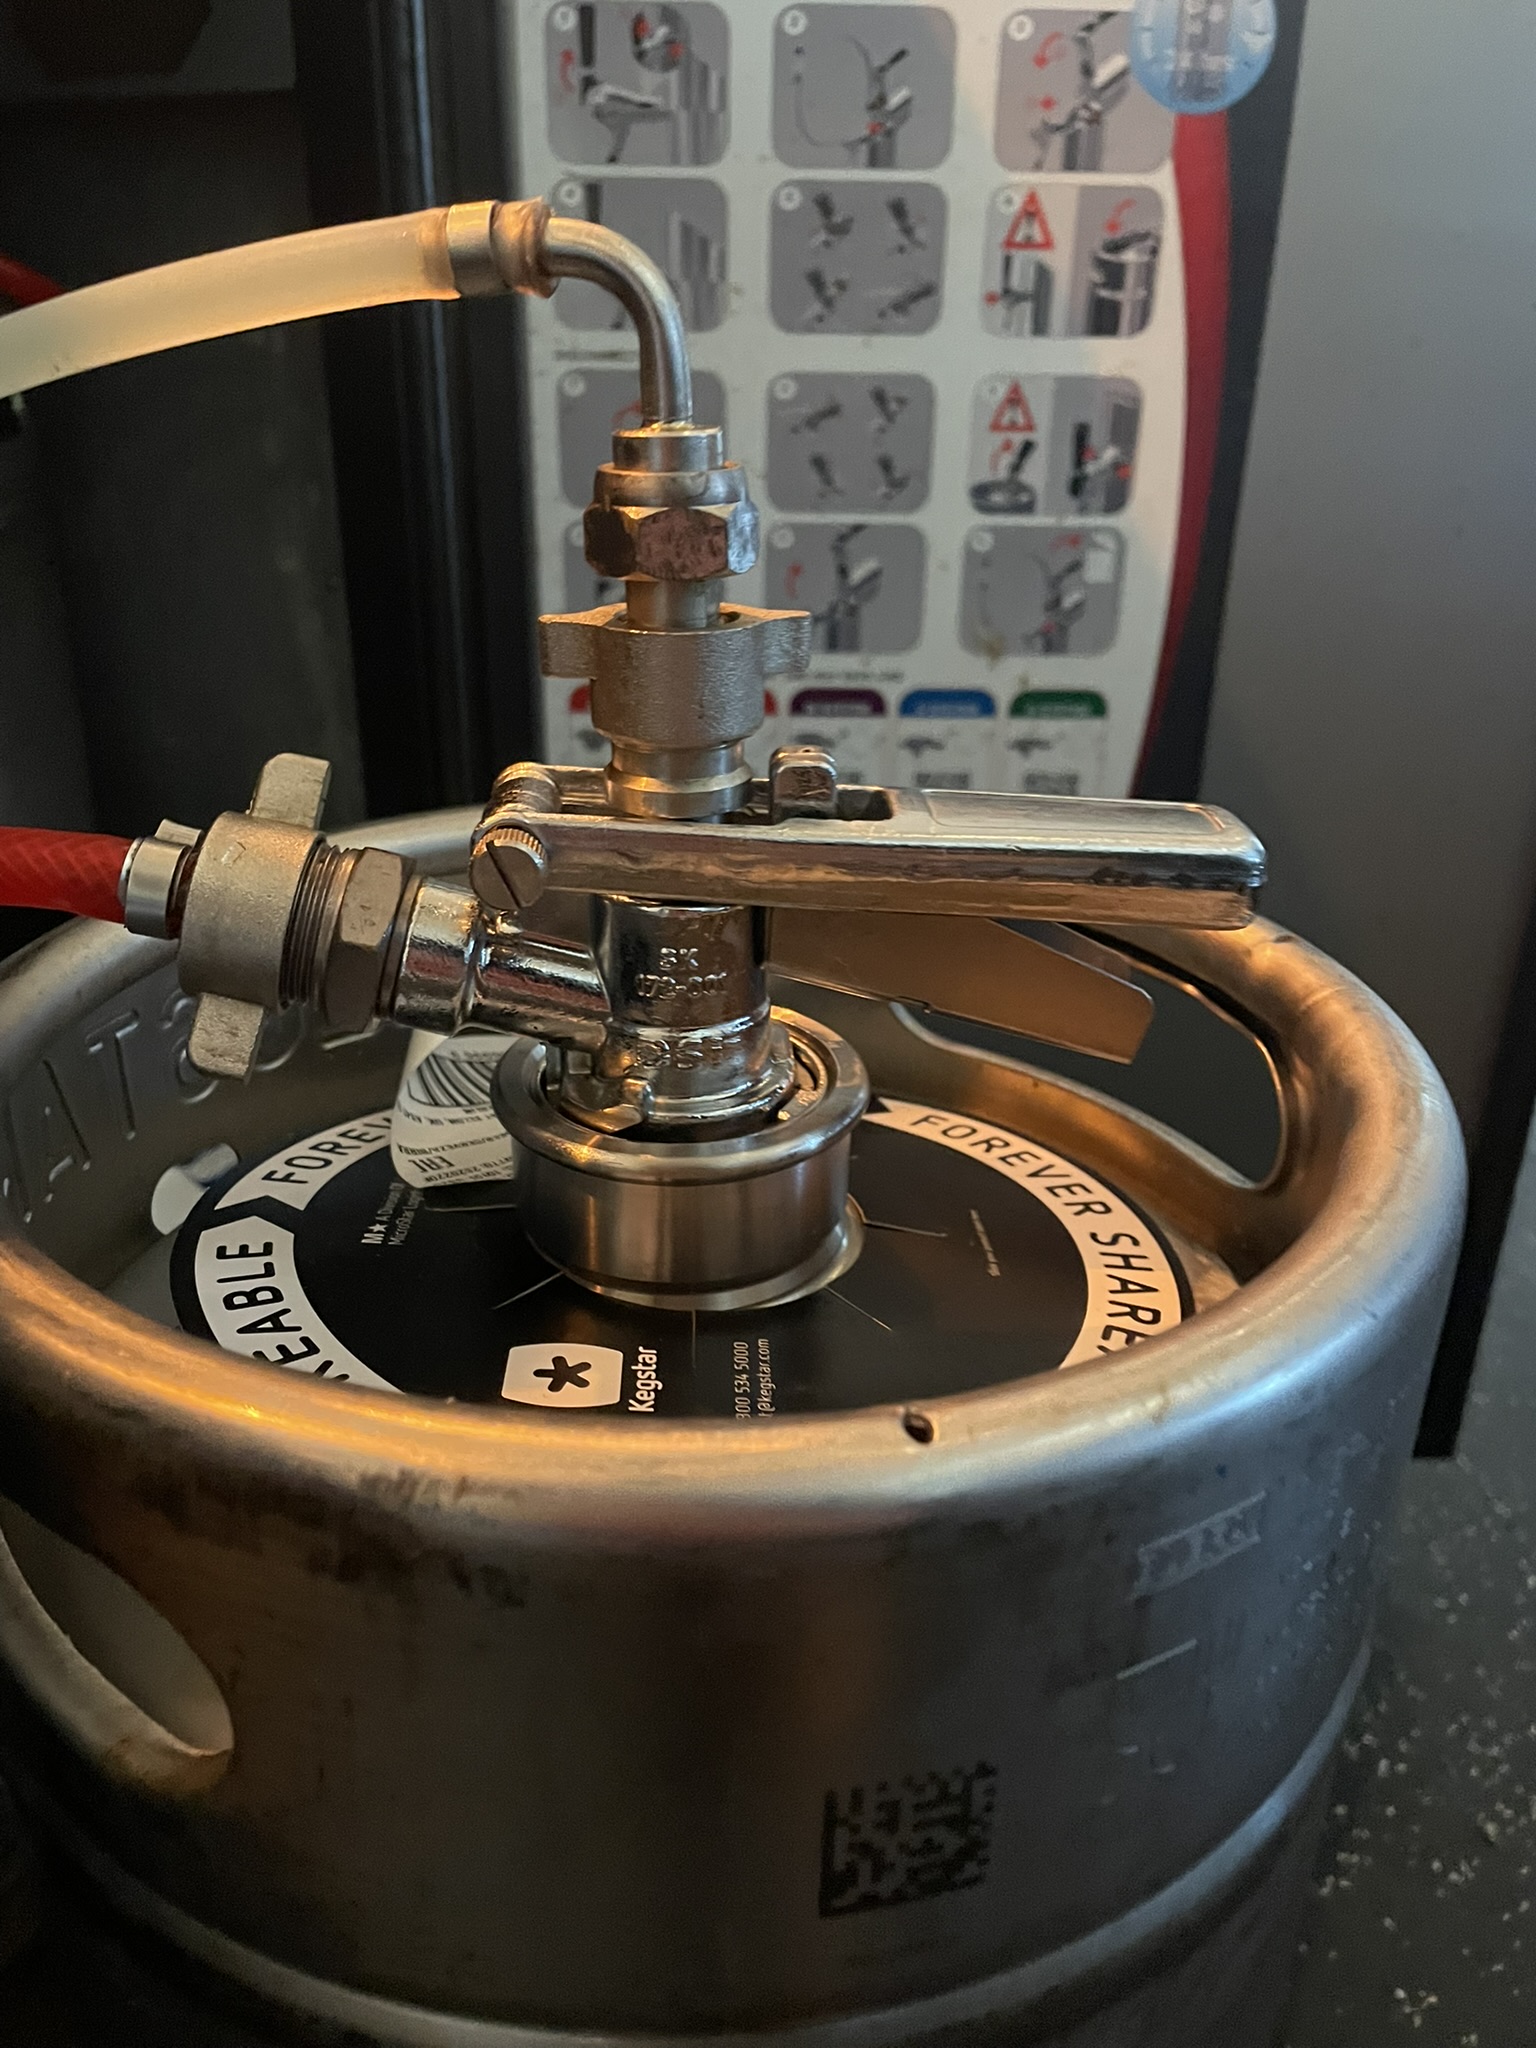
Drievlaks (turning) type
-
Check if the keg is empty
- No beer or only foam = likely empty.
-
You can also lift the keg to feel its weight.
-
Remove the coupler
- Squeeze the handle and pull it up.
- Twist the handle about a quarter-turn to unlock.
- Then pull it straight up to disconnect.
-
Put away the empty keg
-
Gently put it aside. Do not shake or throw.
- Put it in the storage (in the back for Hubble, on the container with empty kegs for Meteor)
-
-
Connect new keg
-
Place it upright and remove the protective seal (trow this in the trash).
-
Twist the coupler into place. You can use the notches on the keg and coupler to align them.
-
Squeeze and push the handle down until you hear a click.
-
-
Test the flow
-
Draft a small amount to see if the beer pours cleanly.
-
Some notes:
- Make sure the coupler is fully turned in place before squeezing and pushing the handle down. You can check this by trying to lift the keg by the coupler. If you squeeze before it is fully in place you will get a beer shower.
- This type is a bit harder to replace than the slide type so don't worry if you don't succeed at first.
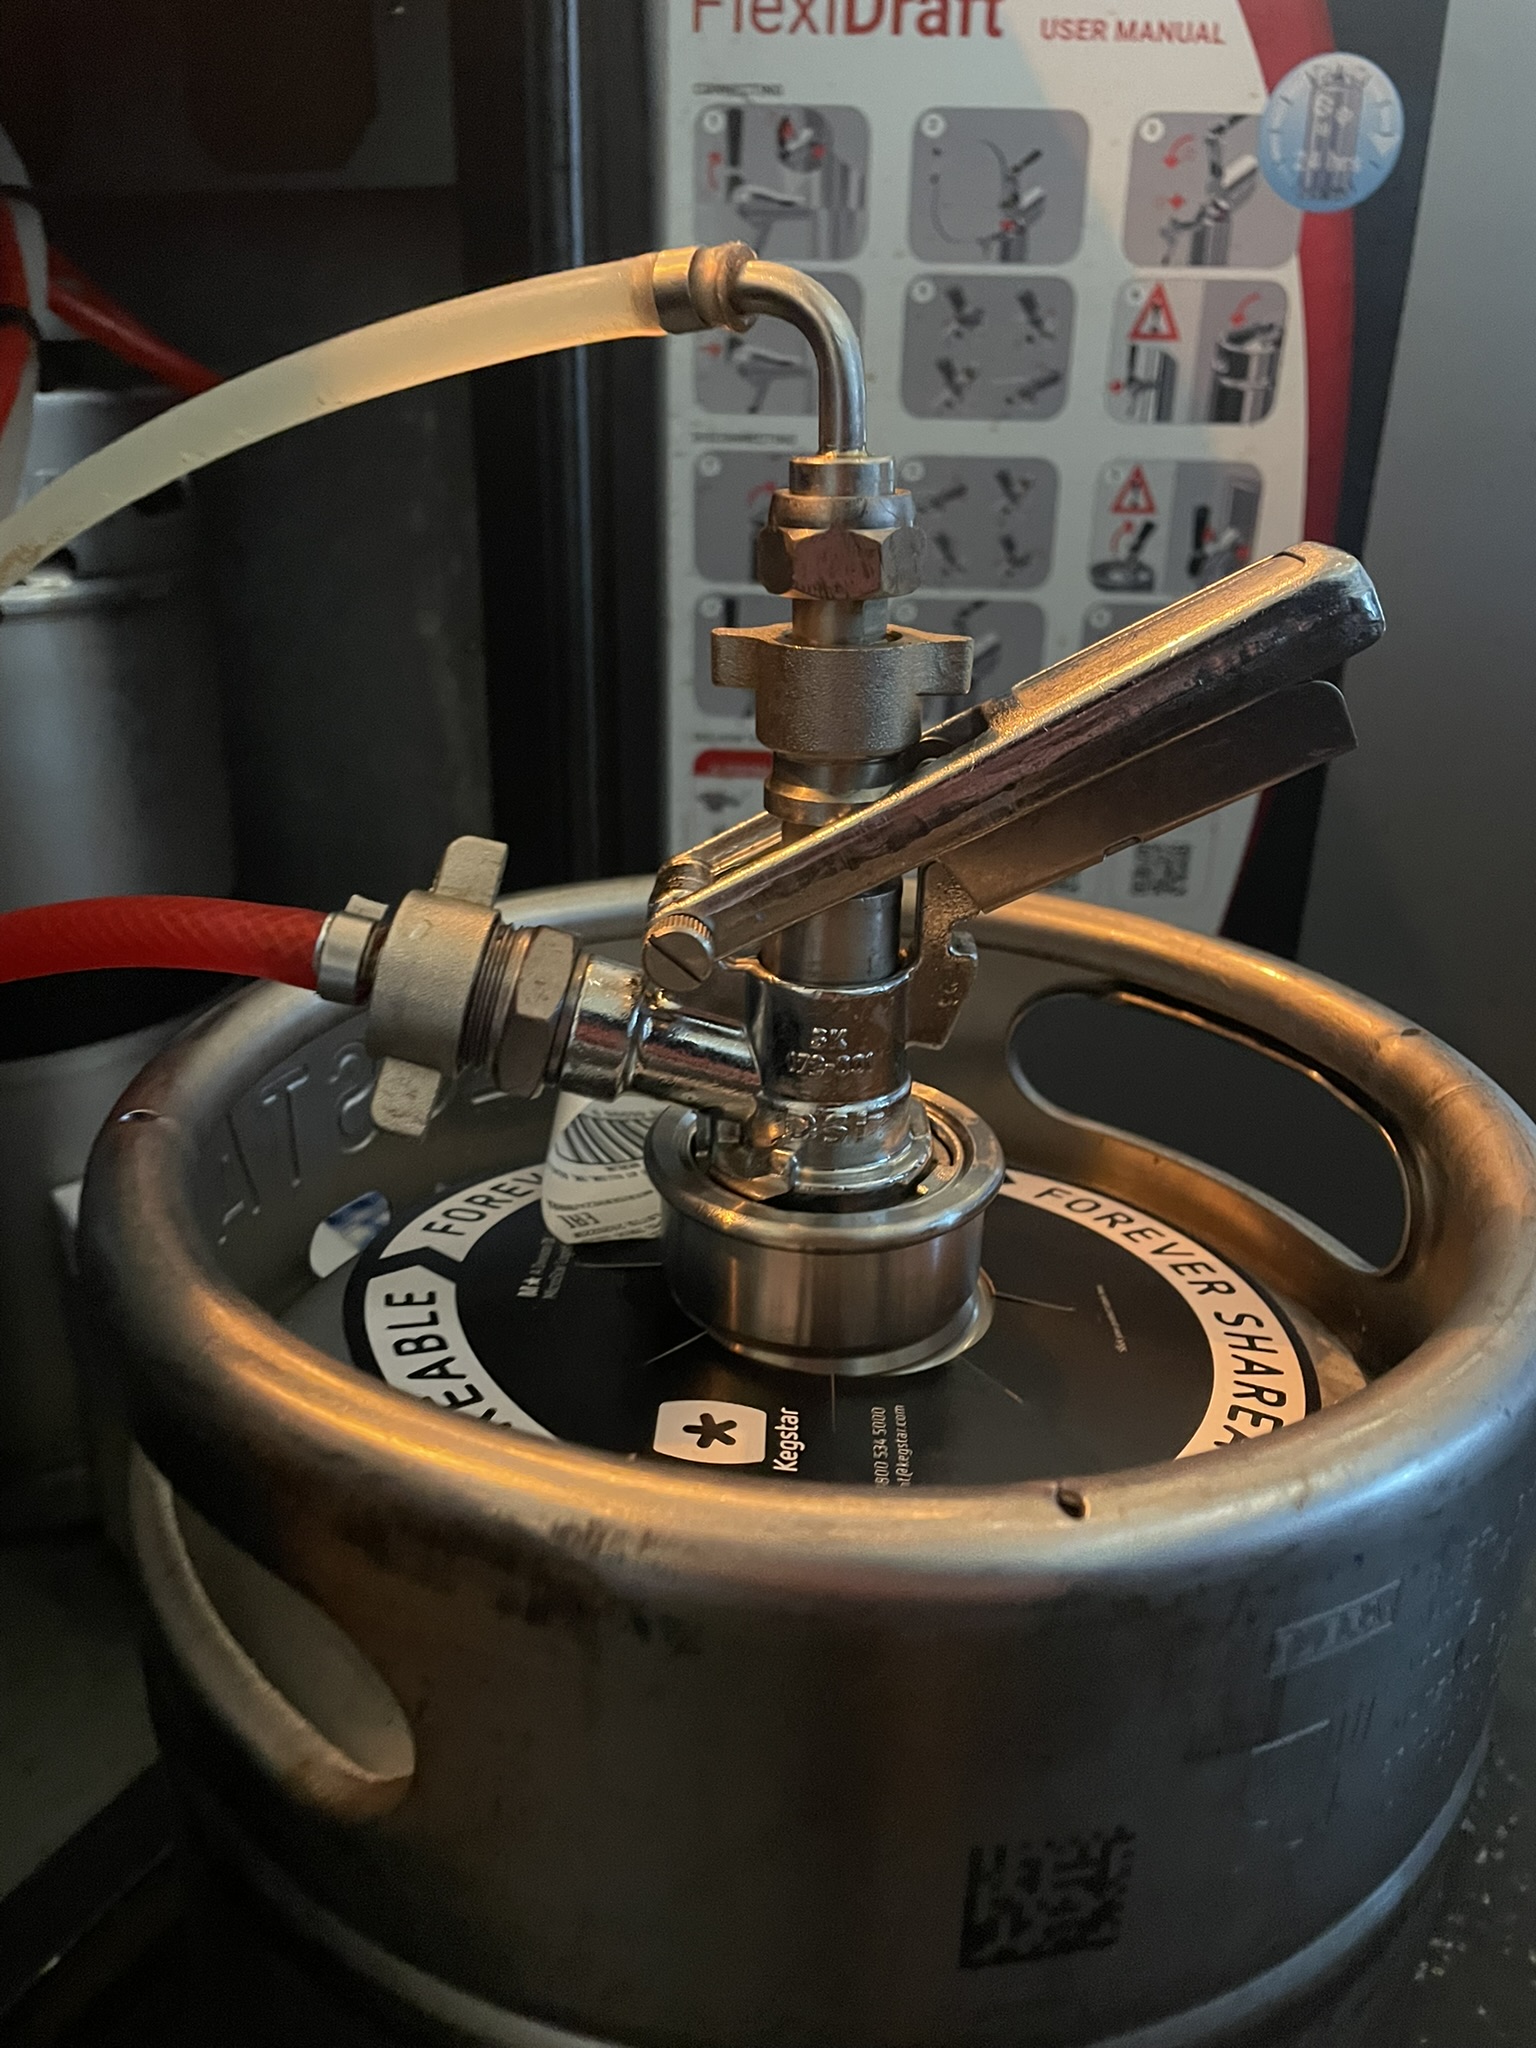
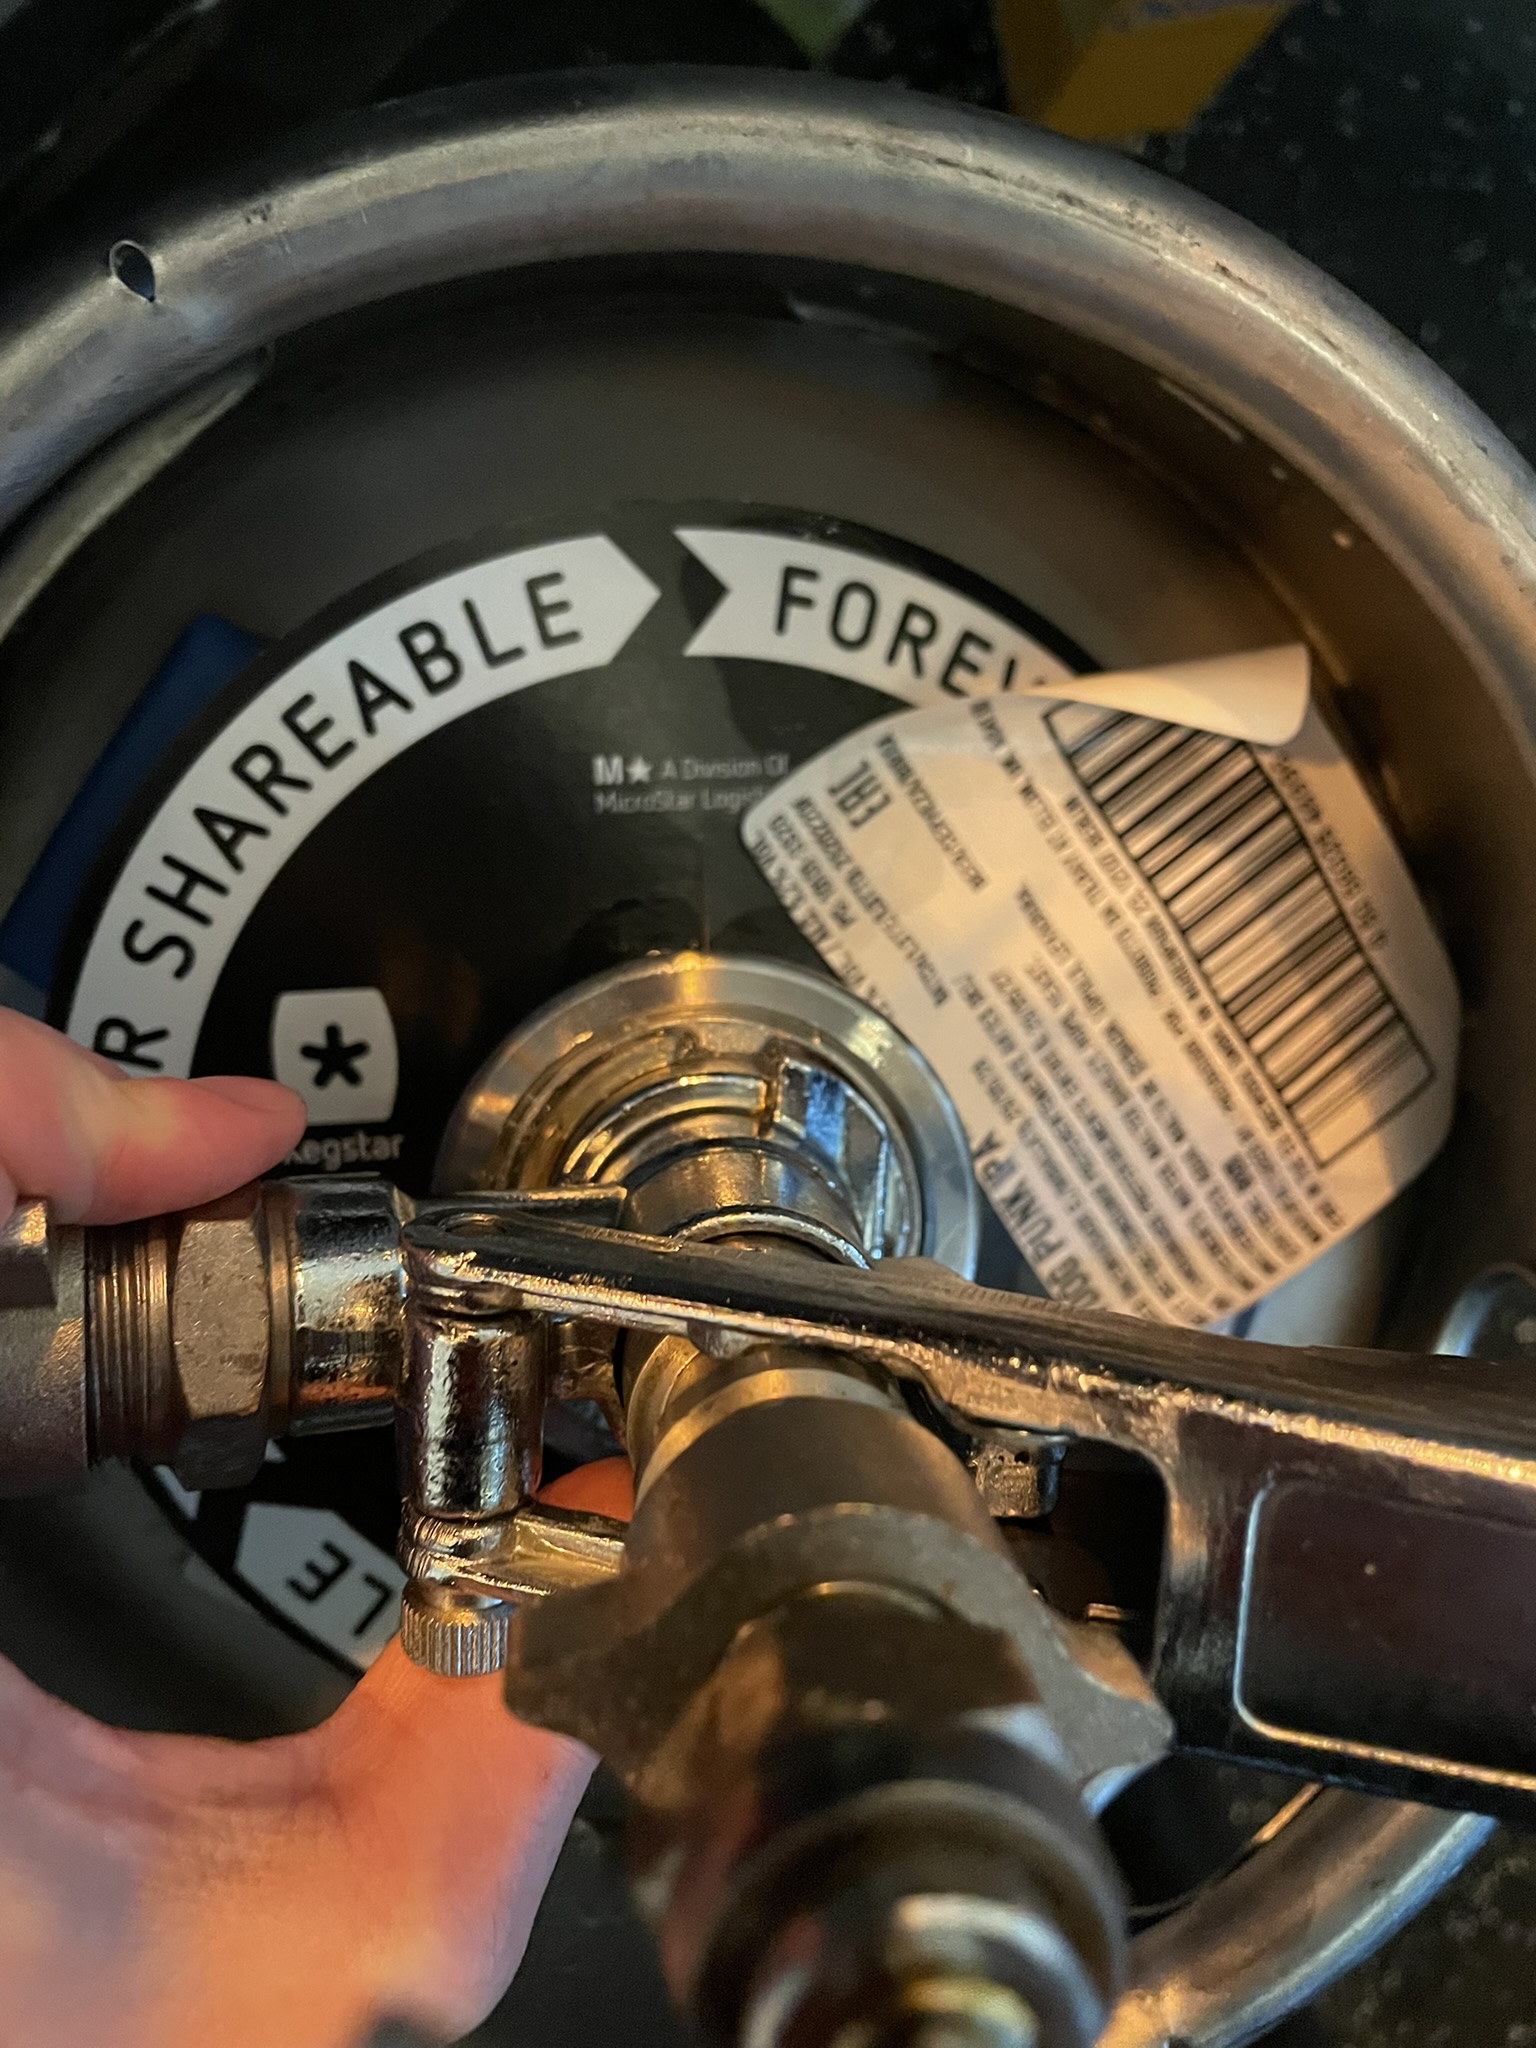
0.0 Keg
[Coming soon]
How to change the beer tank (TO DO)
How to change Chocomel Machine
[In progress]
On this page you will learn how to change the Chocomel Machine (hot chocolate machine) which is only applicable for Hubble.
General steps:
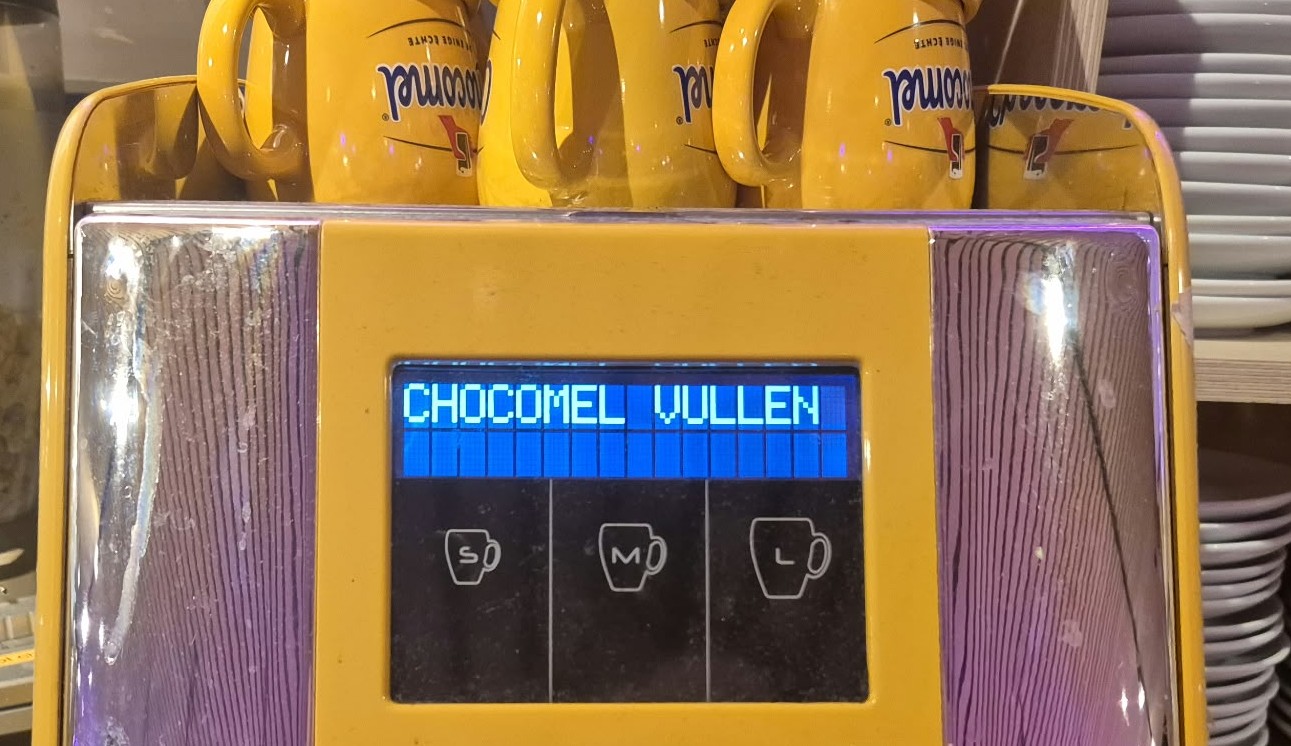
- Start: Machine says 'Chocomel vullen'
The last hot chocolate from the machine will contain less than a normal serving. It is often watery, so please avoid serving it to guests.
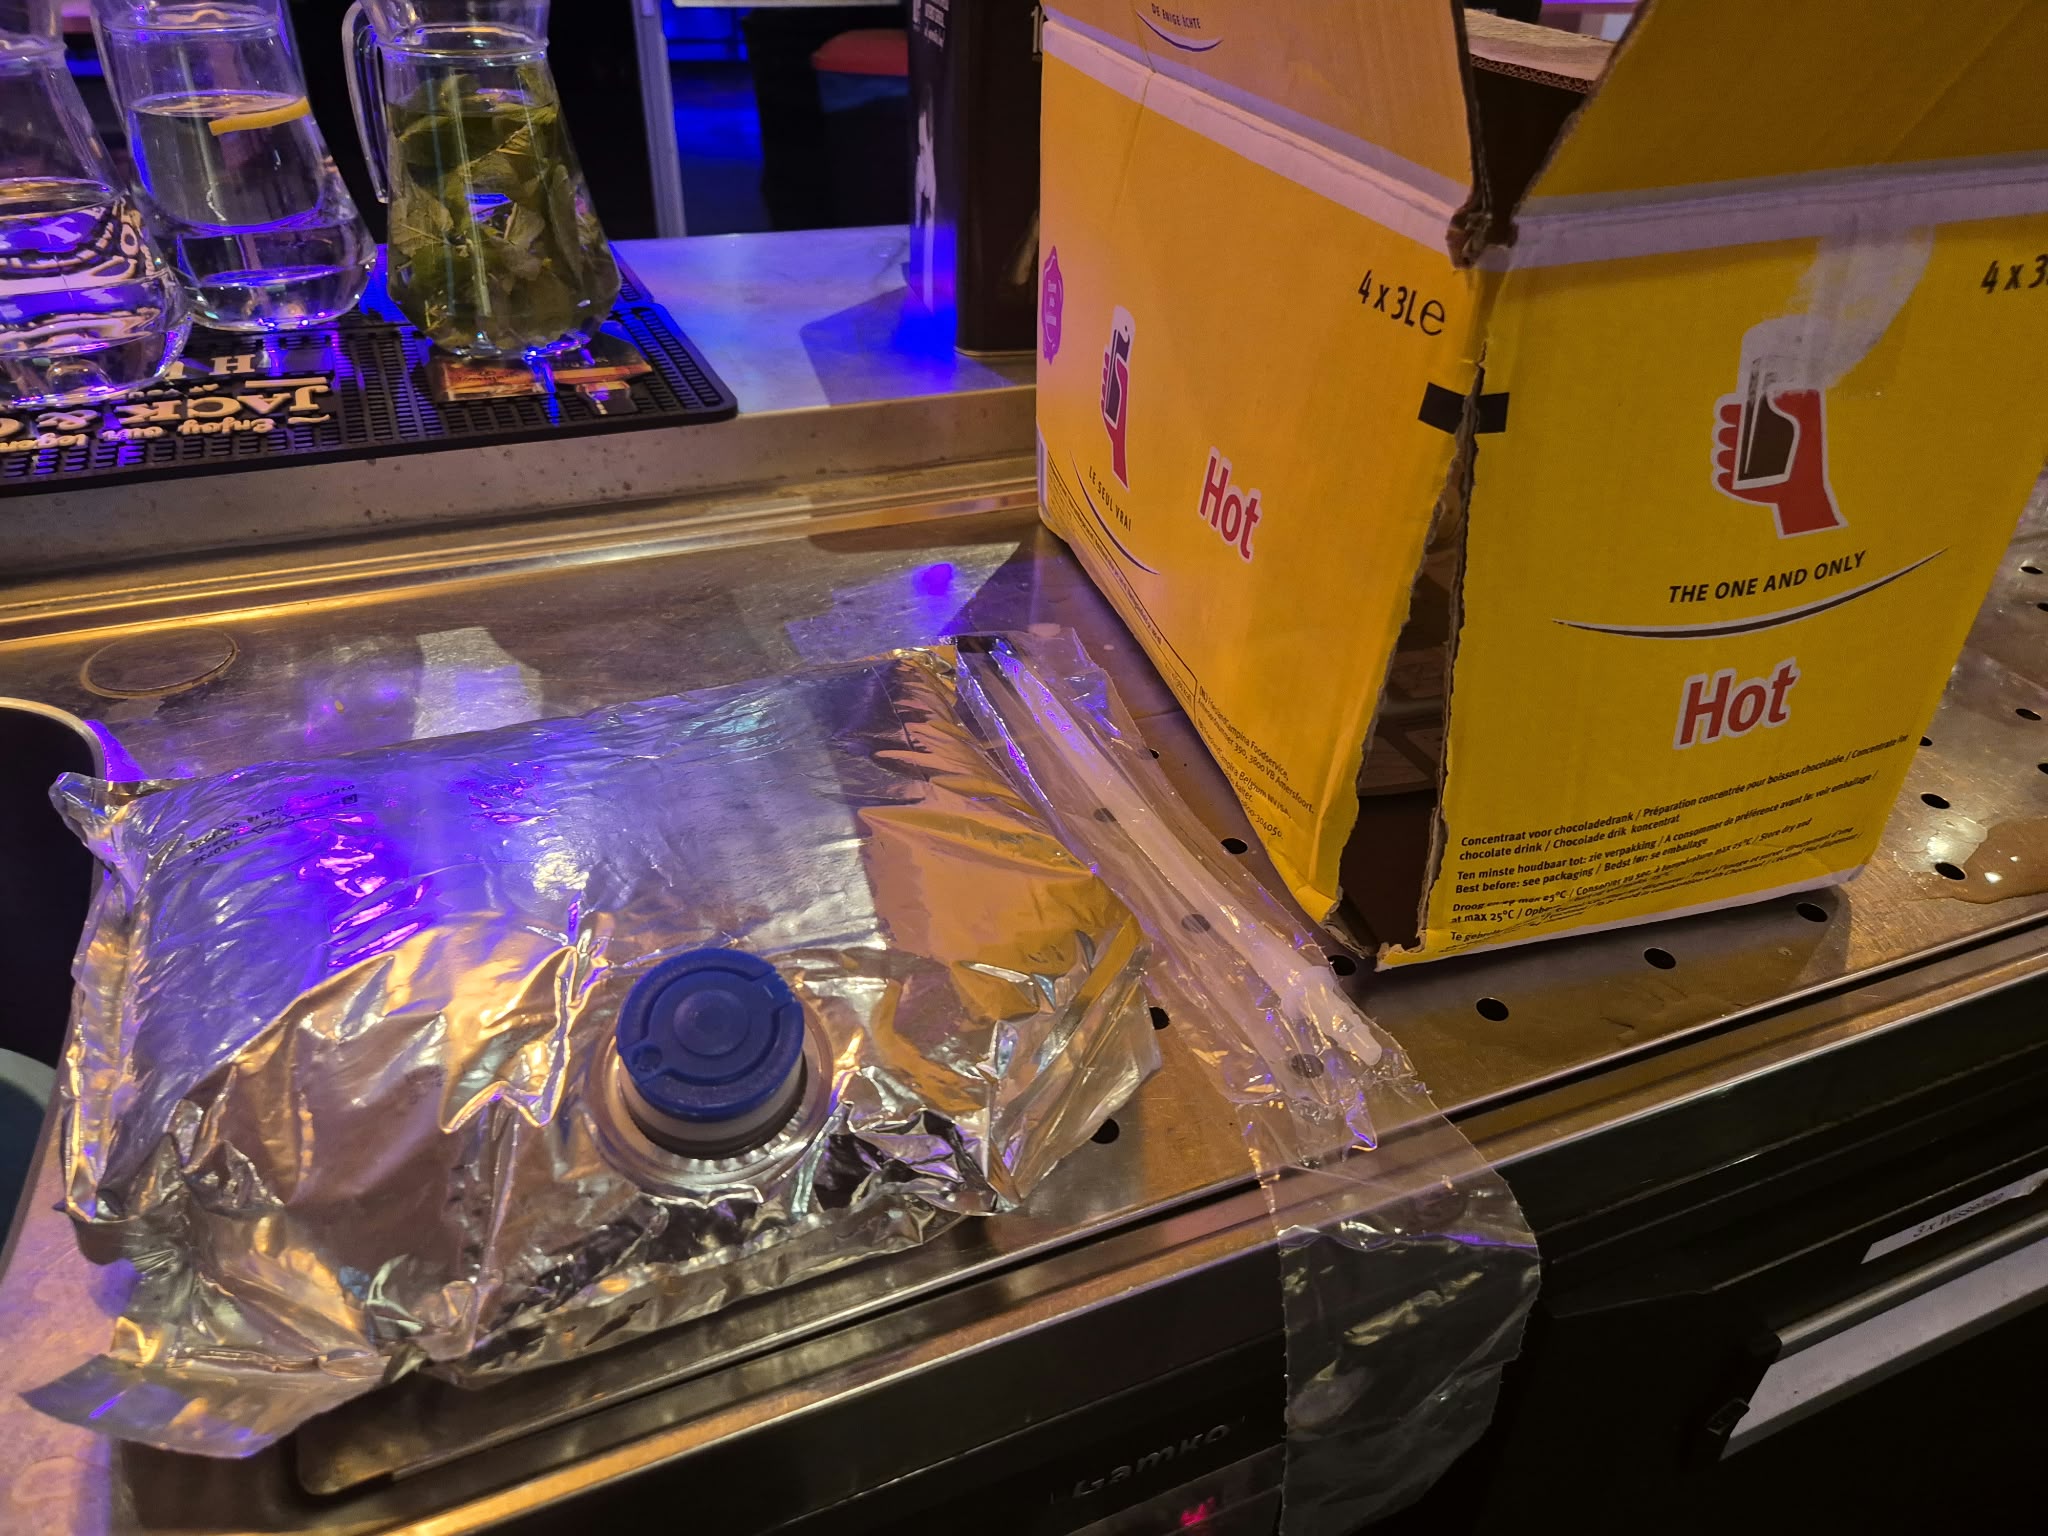
- Get a new Chocmel bag from the back storage
- Open the machine
- Get the tube out of the black box
- Get the bag out of the container and throw away the bag and tube
- Remove the lit of the new Chocomel bag and put it in the machine
- Connect the tube to the black box before connecting the other side of the tube to the bag
- Close the machine
- Presh 'ok' on the message 'Chocomel vullen' (make sure to put a cup underneath)
More detailed guide on how to change the machine
|
|
1. Machine message 'Chocomel vullen'The machine says that you need to refill the machine
The last hot chocolate (and often the second-to-last one as well) from the machine is often a little watery. You can recognise this by the lack of foam and the smaller amount of hot chocolate in the cup compared to a normal serving. |
|
|
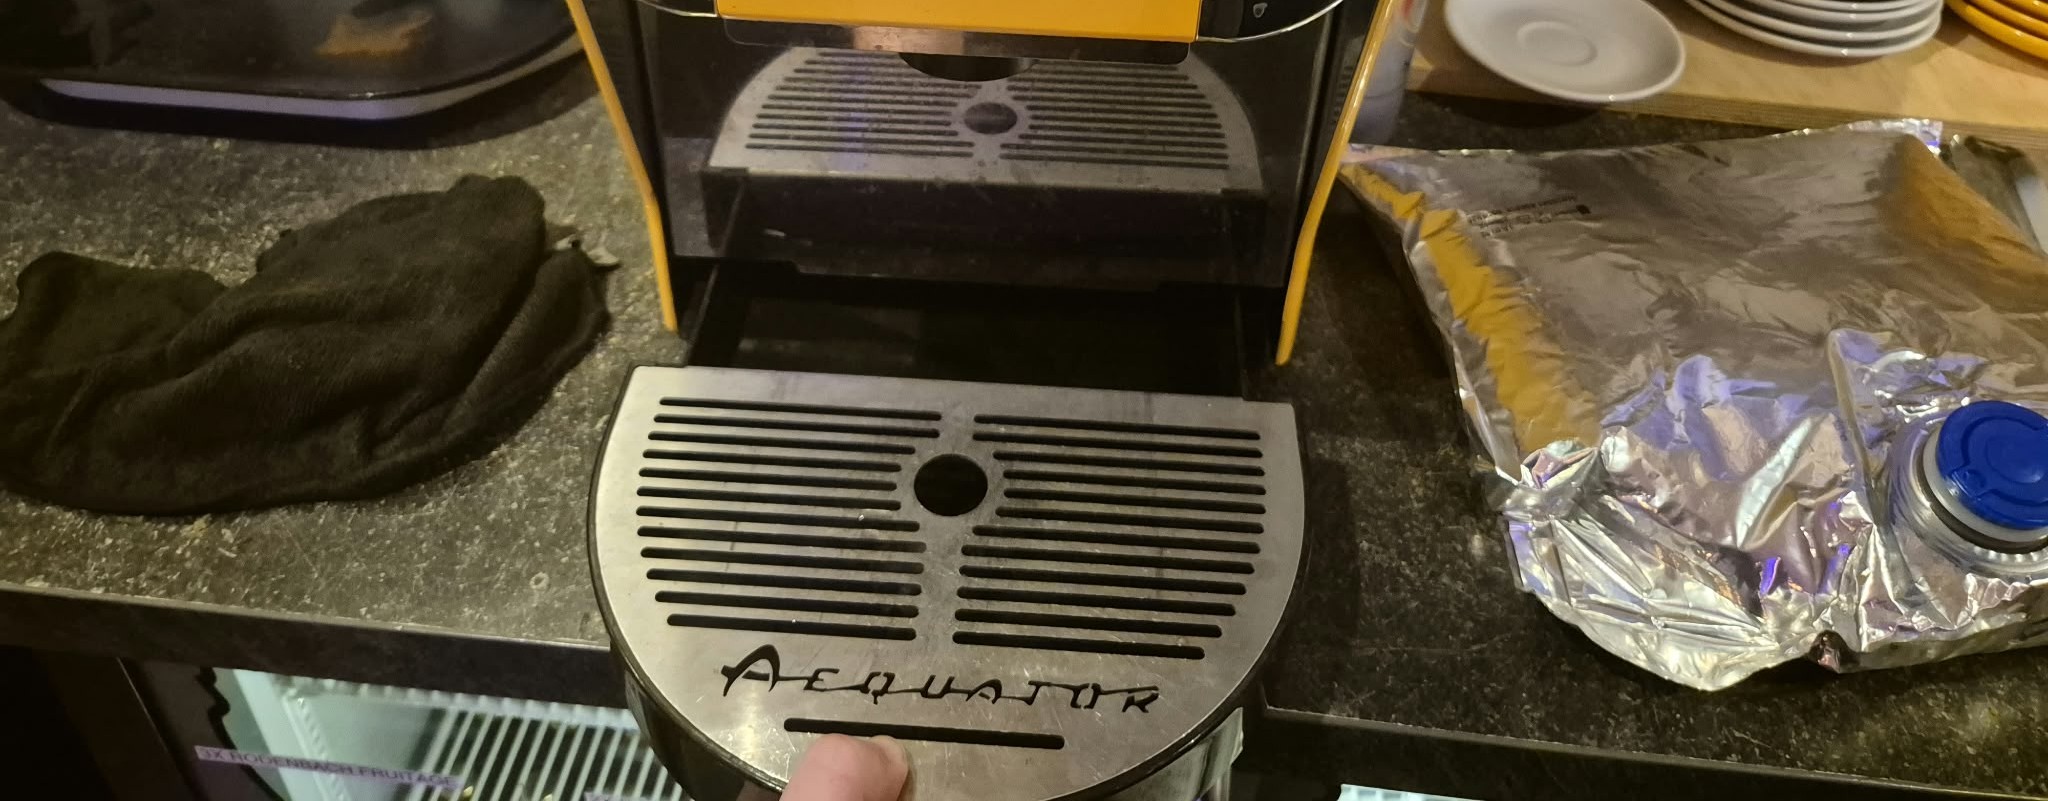
2. Get a new bagThe machine already has a new bag in the machine, but make sure to also get a new bag from the back storage when refilling the machine Get a new bag from the bag out of the box that can be seen in the picture. |
|
|
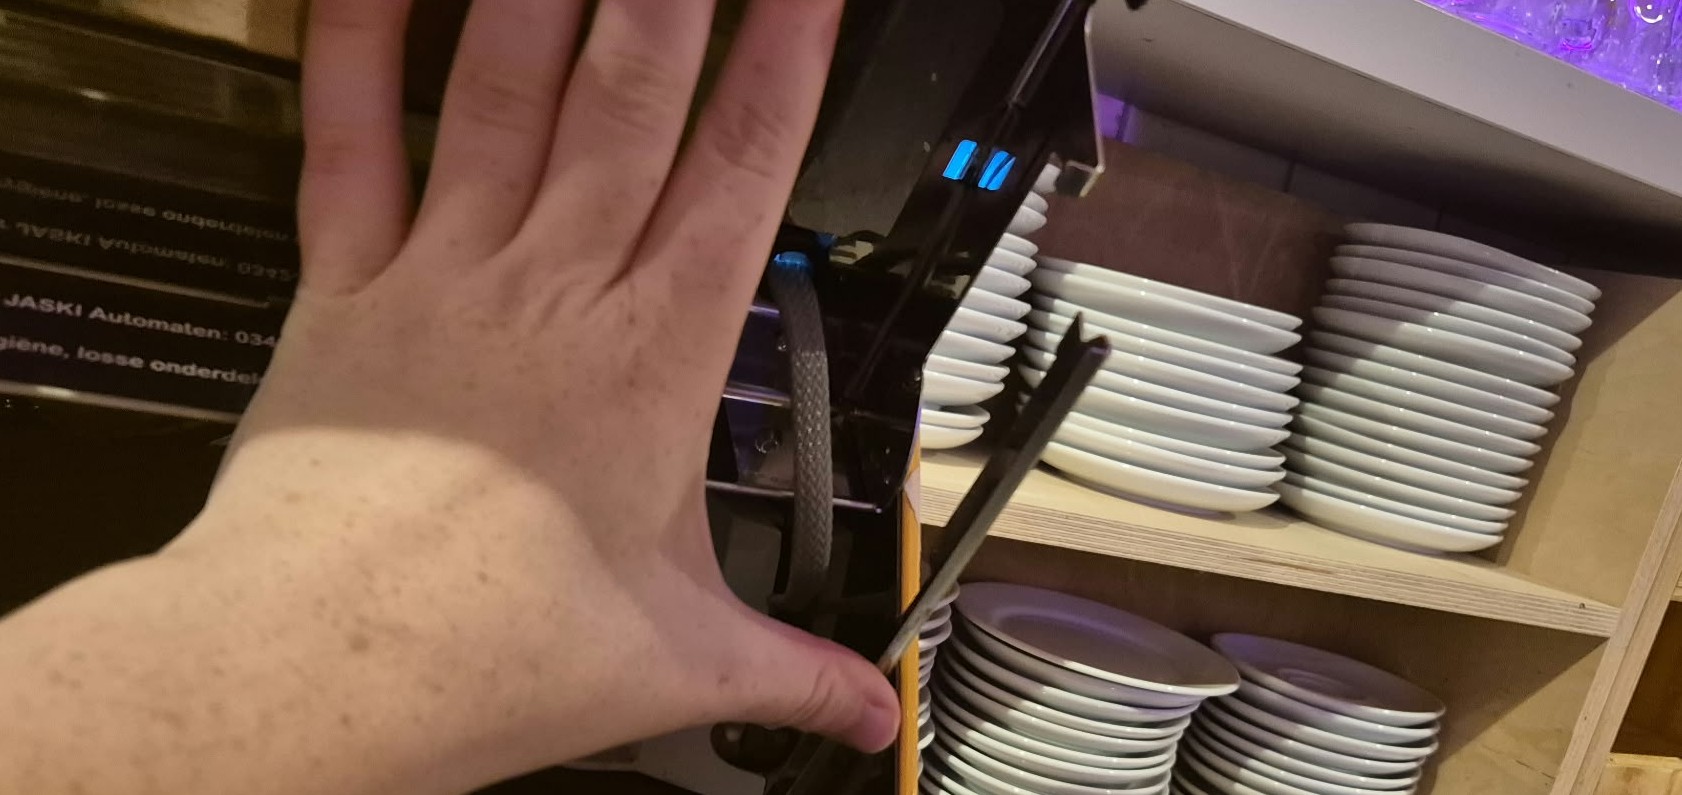
3. Open the machineOpen the machine by pulling the bottom stand so you can lift the front of the machine. |
|
|
Use the support rod located on the right side of the machine. Insert it into the bracket to keep the front panel open and prevent it from falling back down. |
How to change Coffee Milk
[Coming soon]
Advanced Cash Register
On this page, you will learn the advanced Cash Register actions:
- Eigen gebruik (own use)
- Breuk
- Van het house (from the house)
- Tables
- Coins (Hubble only)
- Gift Cards (Hubble only)
- What to do with error orders
Eigen gebruik
Eigen gebruik (own use in English) is used to register what is being consumed by (for example) bartenders and SVH during their shift, so all drinks and food that Hubble/Meteor "pays for".
To register an order or table on eigen gebruik, simply make sure the order/table is selected (visible on the order screen) and press to checkout. On the payment screen, you can select Eigen gebruik. You will get a conformation screen on which you can press yes and then the items will be put on eigen gebruik.
Please note:
- You can only do this when logged in with an svh account.
- Only do this when certain, you can not undo it.
- Only put the bartenders table on eigen gebruik at the end of the evening. That way you can keep an overview of how much you are spending.
Breuk
Breuk is used to register any items that can no longer be sold. This can be (for example) when a bottle is dropped and breaks, or when a wrong order has been made, and the beer has been sitting for too long.
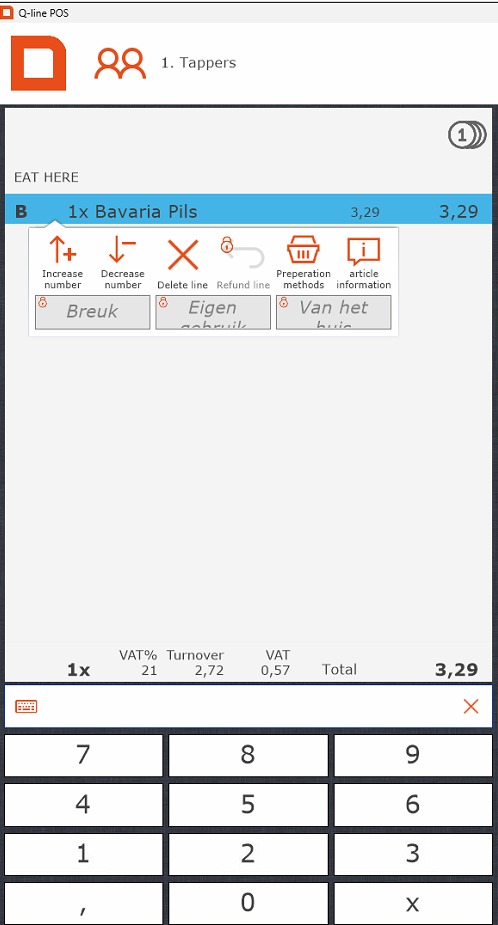
You can put thing on breuk by pressing the item in the order screen and then selecting breuk. Then press pin and the item will be registered as breuk.
Please note;
- Sometimes stuff that should be put on breuk is put on the bartenders table. Due to tax reasons, it is better to put things you actually have to throw out on breuk, so please do so.
- You can only do this when logged in with an svh account.
Van het huis
Van het huis is used to indicate that an item was given away. One of the more common uses for this within Hubble is to give people their birthday half a liter. You could also use it if someone order an eendje Guinness/witte Trappist/ etc to register the 11th item.
To register an item on van het huis, simply make sure the item is selected and press to checkout. On the payment screen, you can select Van het huis. You will get a conformation screen on which you can press yes and then the items will be put on van het huis.
Please note:
- Only use van het huis to give away items. Anything that is drank by you or your bartenders needs to be on the bartenderstable, and eventually, eigen gebruik.
- You can only do this when logged in with an svh account.
Tables
Tables are used to temporarily store items that, for example, a reservation has ordered. This table can then be paid of at the end of the reservation, or be put "op rekening".
To open a table, press show table and select the table you want to select.
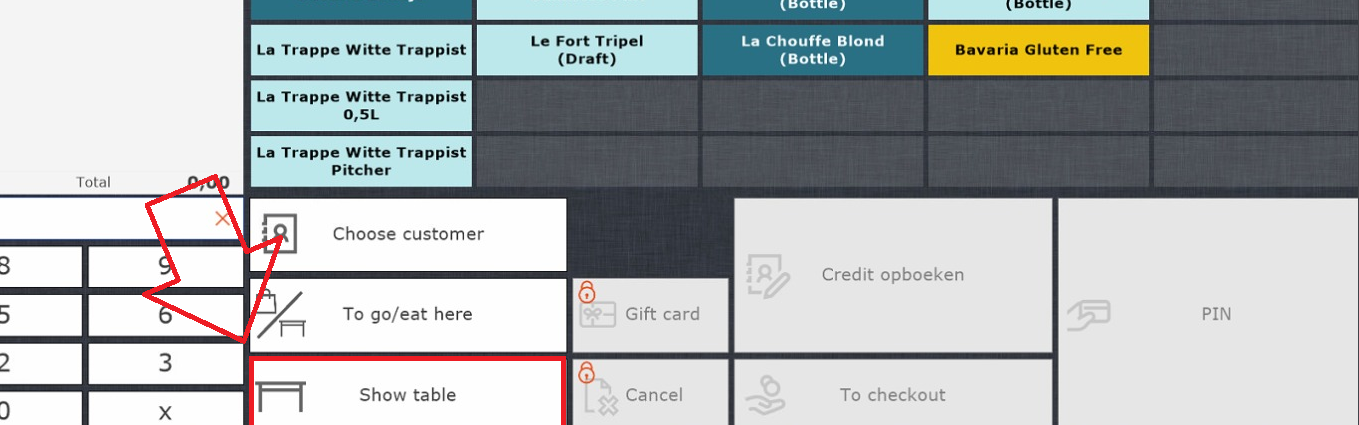
To add items to a table, open the table, select the items, and then press register on table. This will be in the same spot the open table button was before. The items will now automatically be registered on the table.
If someone wants to pay of the table, you again open the table, and then press pin.
Please note:
- Give your table a recognisable name. You can do this by opening the table and then pressing the pencil at the top left.
- Tables are not the same as accounts.
- You can link an account to a table, same as you would to an order.
- If there is a table for a reservation, be sure to check whether they are paying that evening or "op rekening". If they pay that evening, make sure you know who will be paying and make sure they pay.
Coins (Hubble only)
Hubble also distributes coins for special occassions. The common coins are blue. There are usually also orange coins in use, since those are bought and given out by Wervingsdagen. There are also other colours, such as pink.
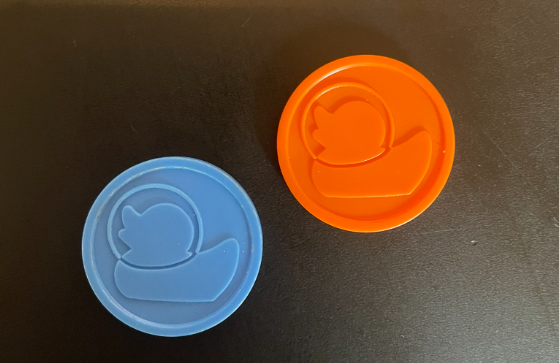
A coin is worth the price of one beer.
When someone wants to pay with coins, press the little coin logo at the top of the order screen. Prices for all items will now be displayed in coins.
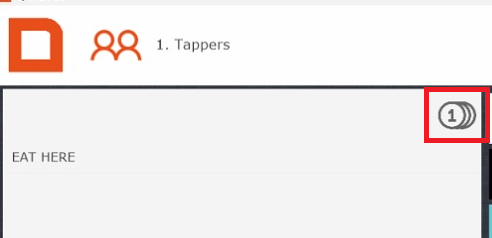
Check if the total is the same as the amount of coins handed in. If this is correct, press pin to finish up the transaction.
Please note:
- An order can not be partly paid in coins and partly by pin. If it is multiple items, you can split up the order.
Gift cards (Hubble only)

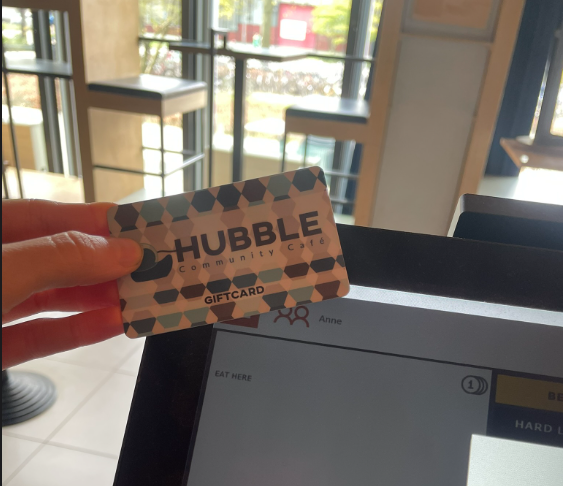
Above you can see a giftcard. These are NFC passes, so they don't have a barcode. If someone wants to use a card to pay, go to checkout and press giftcard. You can scan the giftcard on the top left of the screen to pay.
What to do with error orders (guest paid for something they don't want)
Sometimes there is a communication error between a guest and the person behind the register, causing a guest to pay for something they don't want. Usually this is a small amount and it can be fixed by offering the guest another item of a similair value (or slightly more). This can only be done by the SVH.
We are unable to transfer money back to guests.
Technical Back End
On this page, you will learn the following topics:
Hubble
- How the music works
- How the lights work
- How the screens work
- How the microphones work
- How the beamer works
- How the sound limited works
Meteor
- How the music works
- How the lightning works
- How the beamer works
Hubble
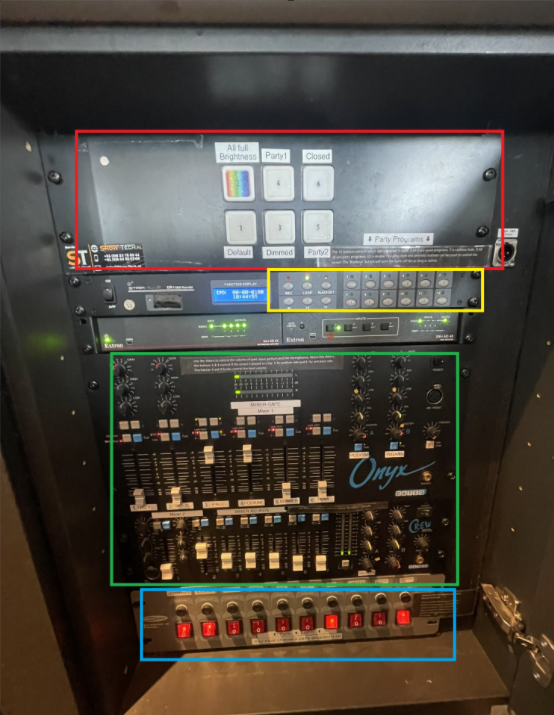
To turn the light and sounds on, press all the red buttons on the bottom (blue part) from left to right. To turn everything off, press them from right to left.
Music
- The music is played via Spotify on the Ipad behind the bar. If you want to play a song, ask the SVH to unlock the ipad for you.
- The level of the sound is determined by the sliders in the green part. The fader labeled Ipad is used for the spotify.
- If something is wrong with the sound, check if all turning knobs are aligned with the tapes, as well as the LEDs.

- When a presentation/pubquiz/ etc is happening, it can be nice to turn of music on that side of the bar. All sound inputs can be turned on seperately for side A(podium) and side B (black tables). On the picture above you can see that IPAD is on on both sides, and all other inputs are turned off.
Lights
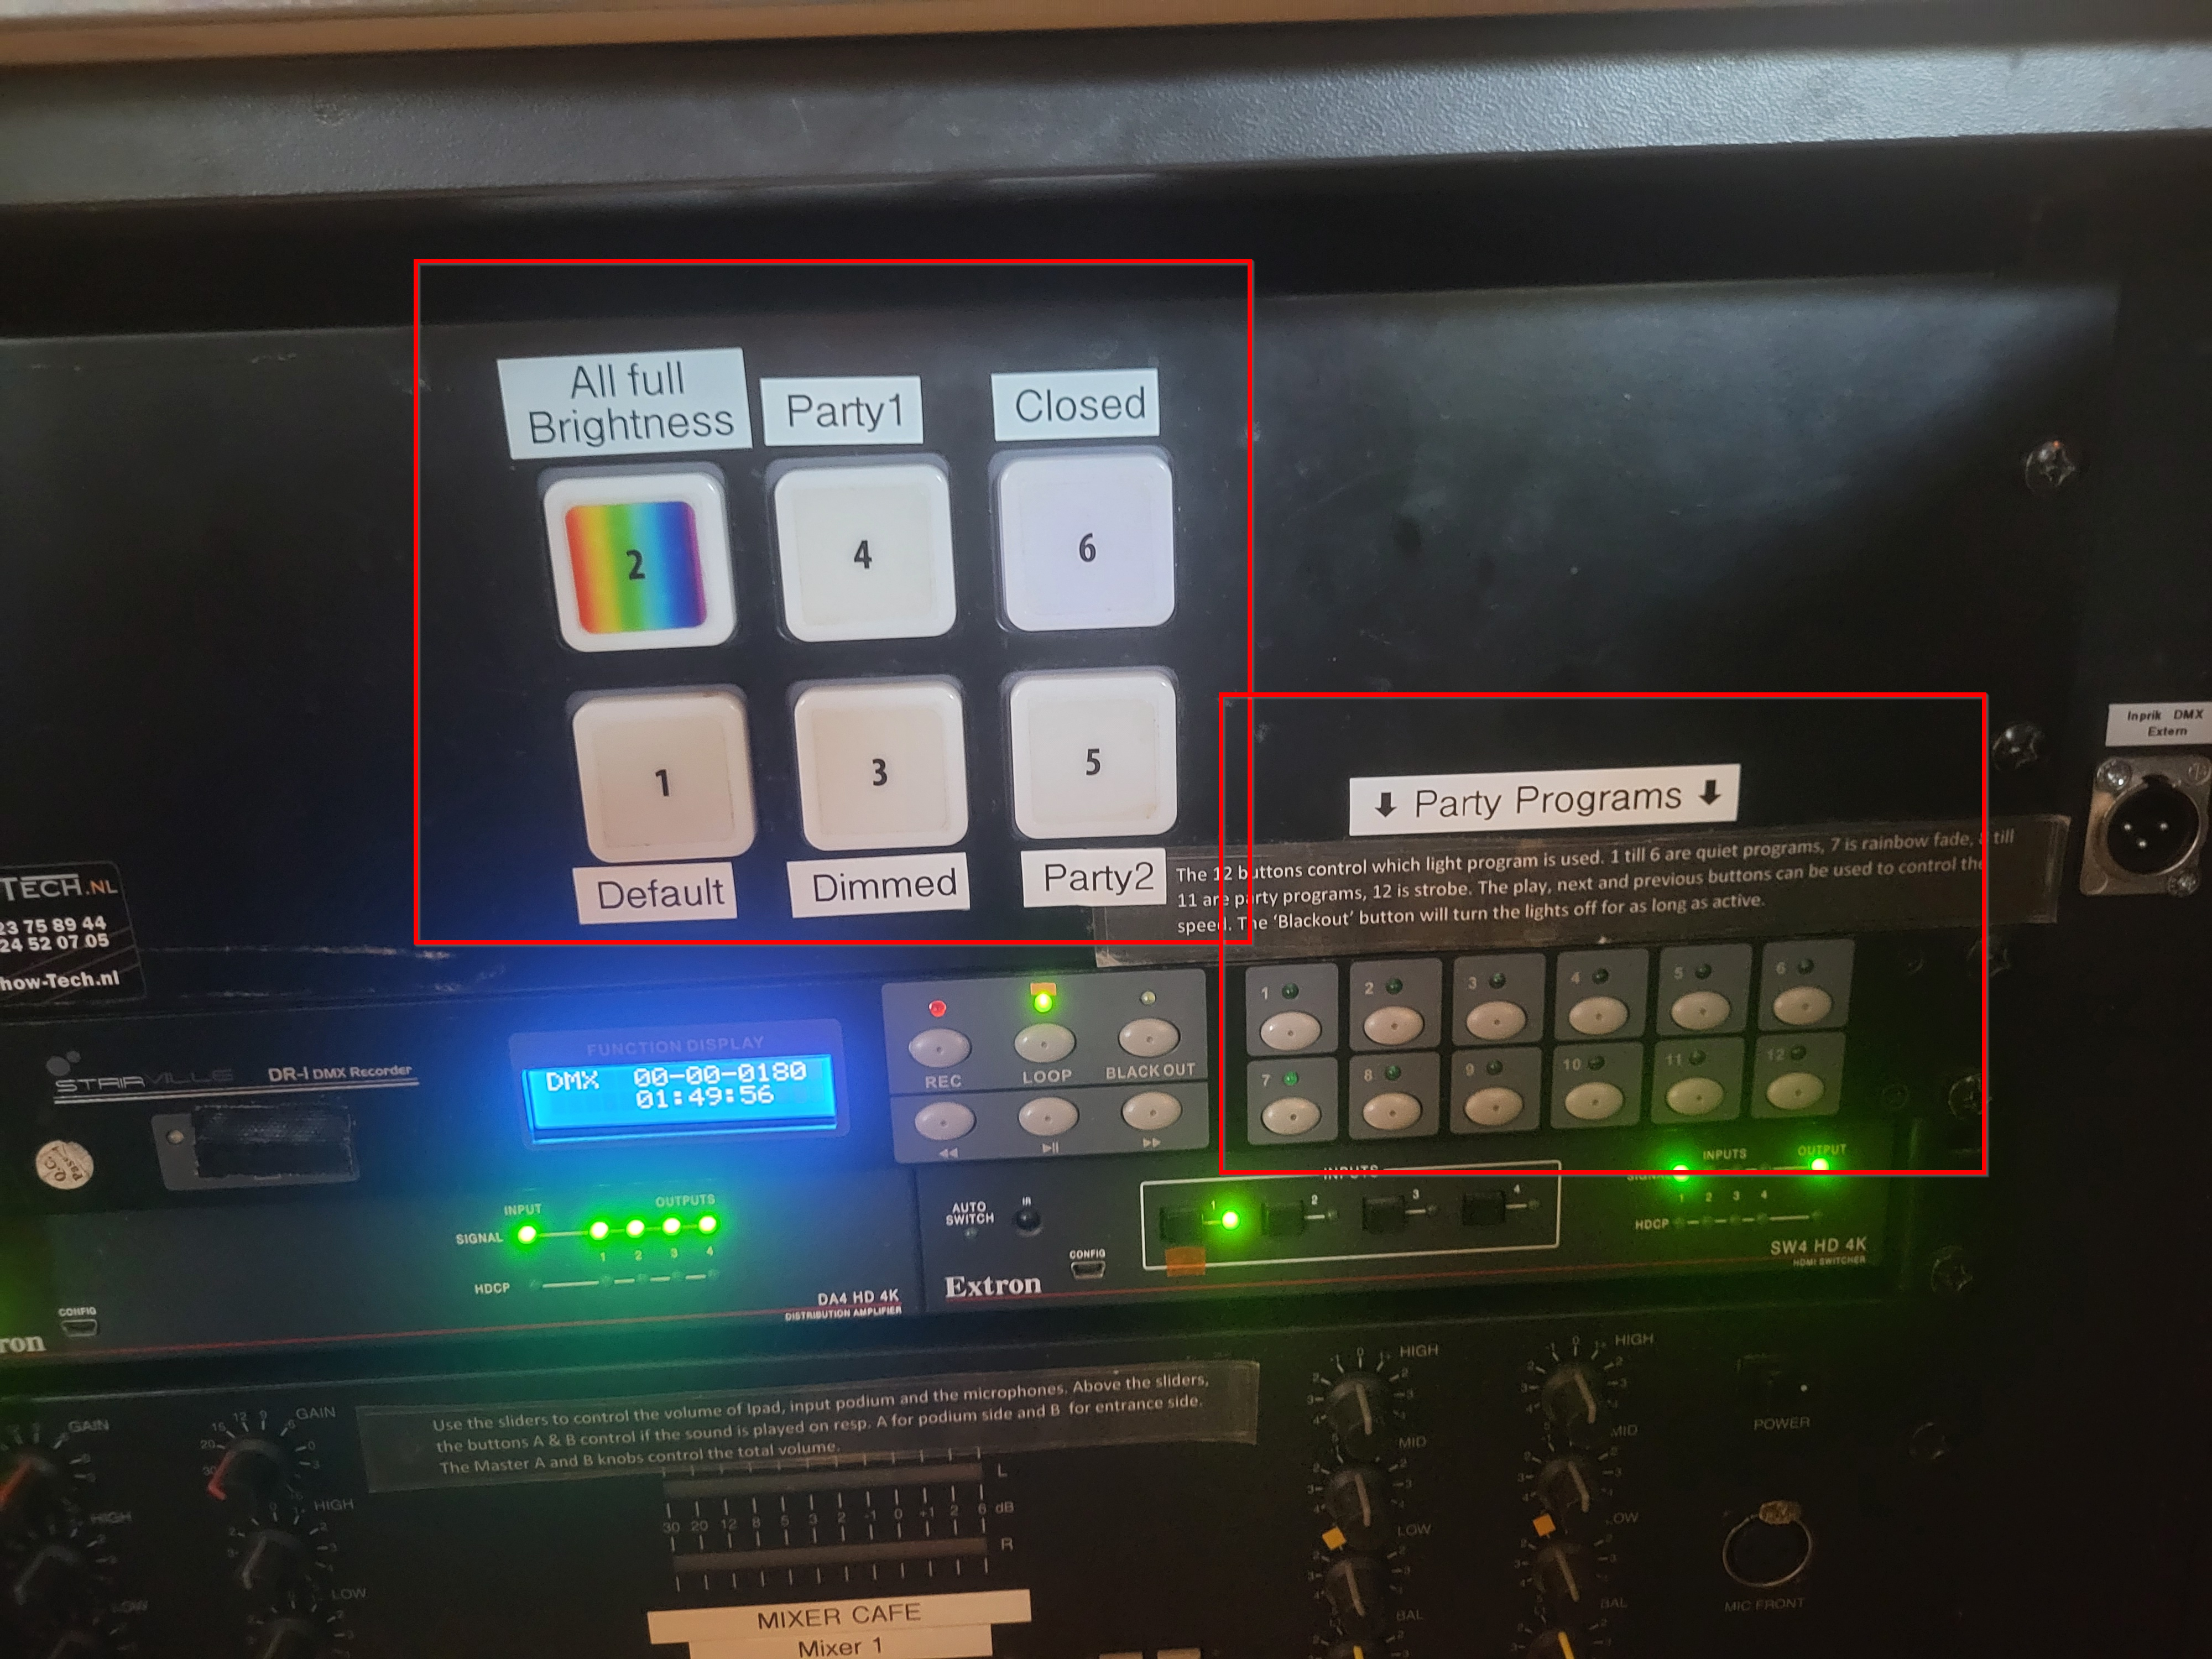
The Party Programs in the bottom right of the image can be selected for more expressive lighting with, among others, the moving heads. If the evening can use more funky lighting one of these can be activated by the SVH.
Screens
The two screens in Hubble are generally not touched, sometimes there are guests in the bar that would like to either watch something or play a game on them. Then with permission of the SVH they can connect to a screen using the HDMI cable that is hanging underneath.
If for any reason you do need to do anything with the screens, the remote for the screens can be found in the left door all the way on the right behind the bar.
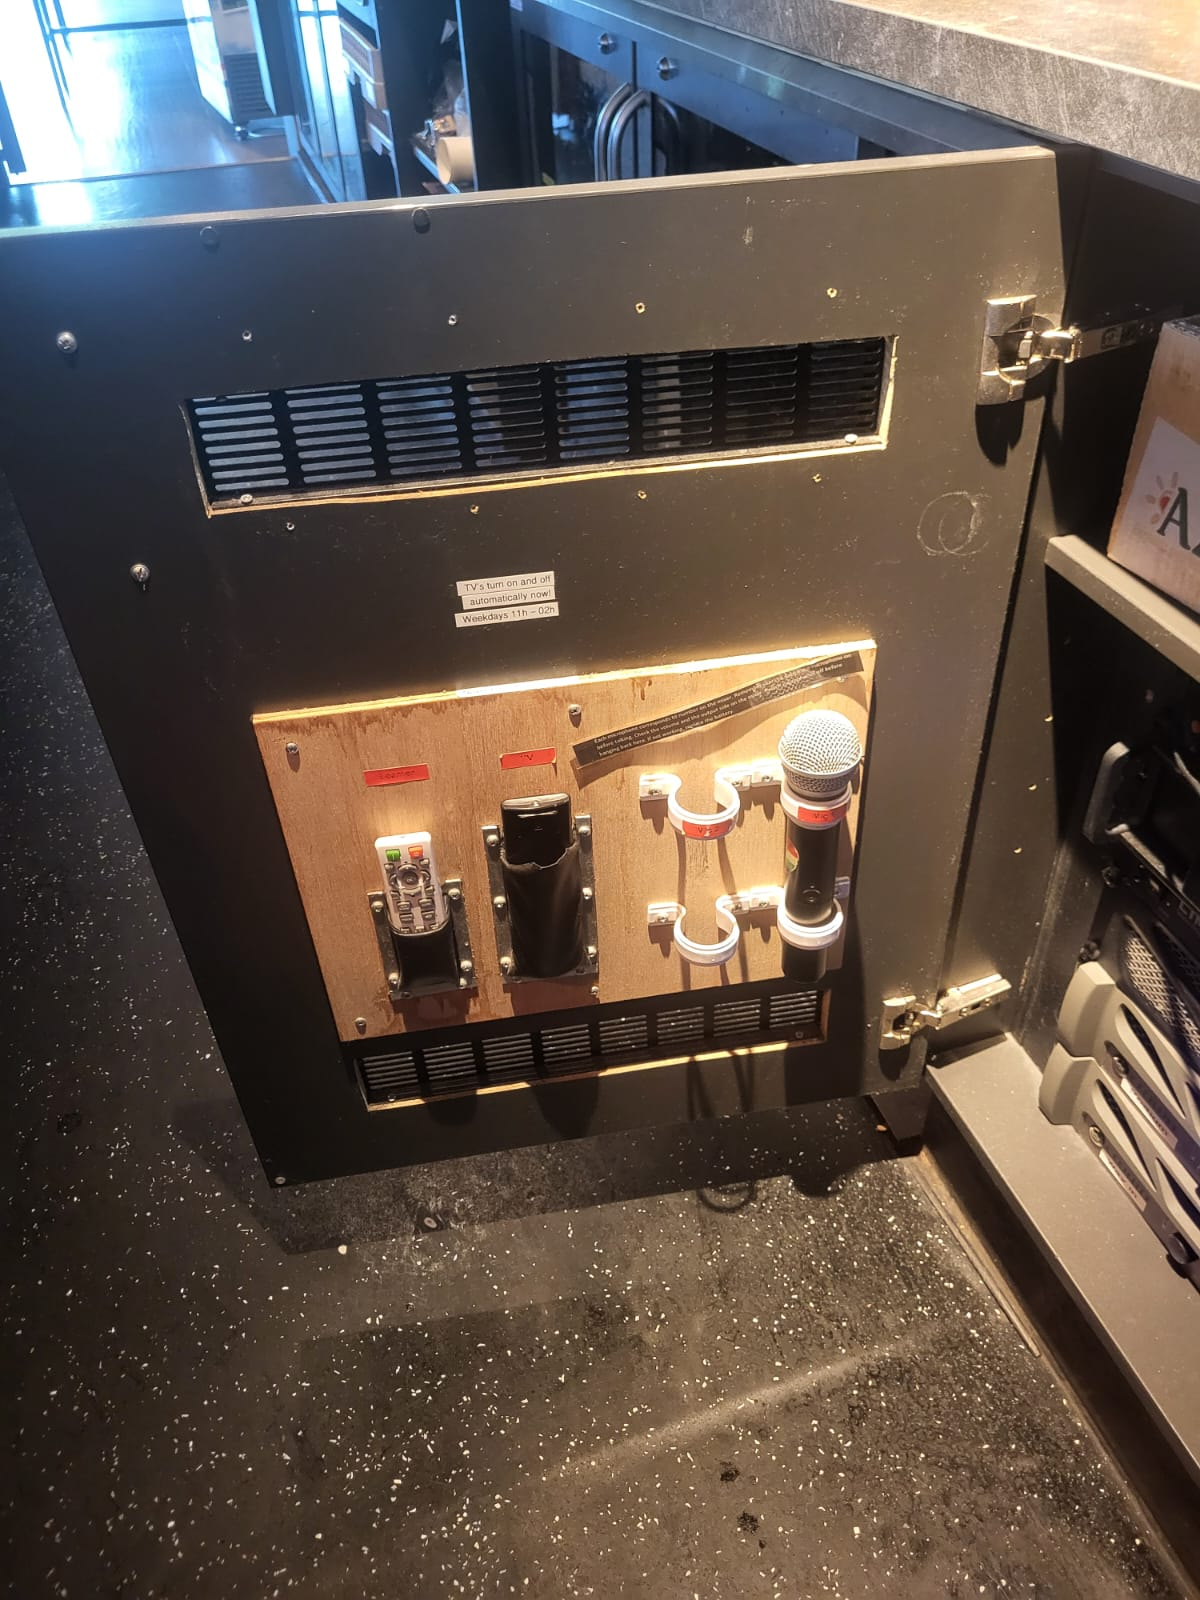
The black remote labeled "TV" is for the screens.
Beamer
The beamer can be operated using the white remote labeled "Beamer" in the image above.
Using the beamer:
- Turn on the beamer using the red button on the top right of the remote
- Pull down the white screen until it matches the beamer's projection, then hold it still for ~3 seconds in order for it to stay in place
- The HDMI cable for the beamer can be found on the right side behind the podium on the ground
After using the beamer:
- Turn off the beamer using the red button on the top right of the remote
- Roll the white screen back up by pulling it down slightly and then releasing it
Sometimes the beamer will not work correctly, make sure it's set to the correct hdmi output using the remote.
Microphones
If people want to use a microphone, this can be found on the inside of the door next to the panel (see picture above). They are labeled Mic 1 and Mic 2.
Using the Microphones:
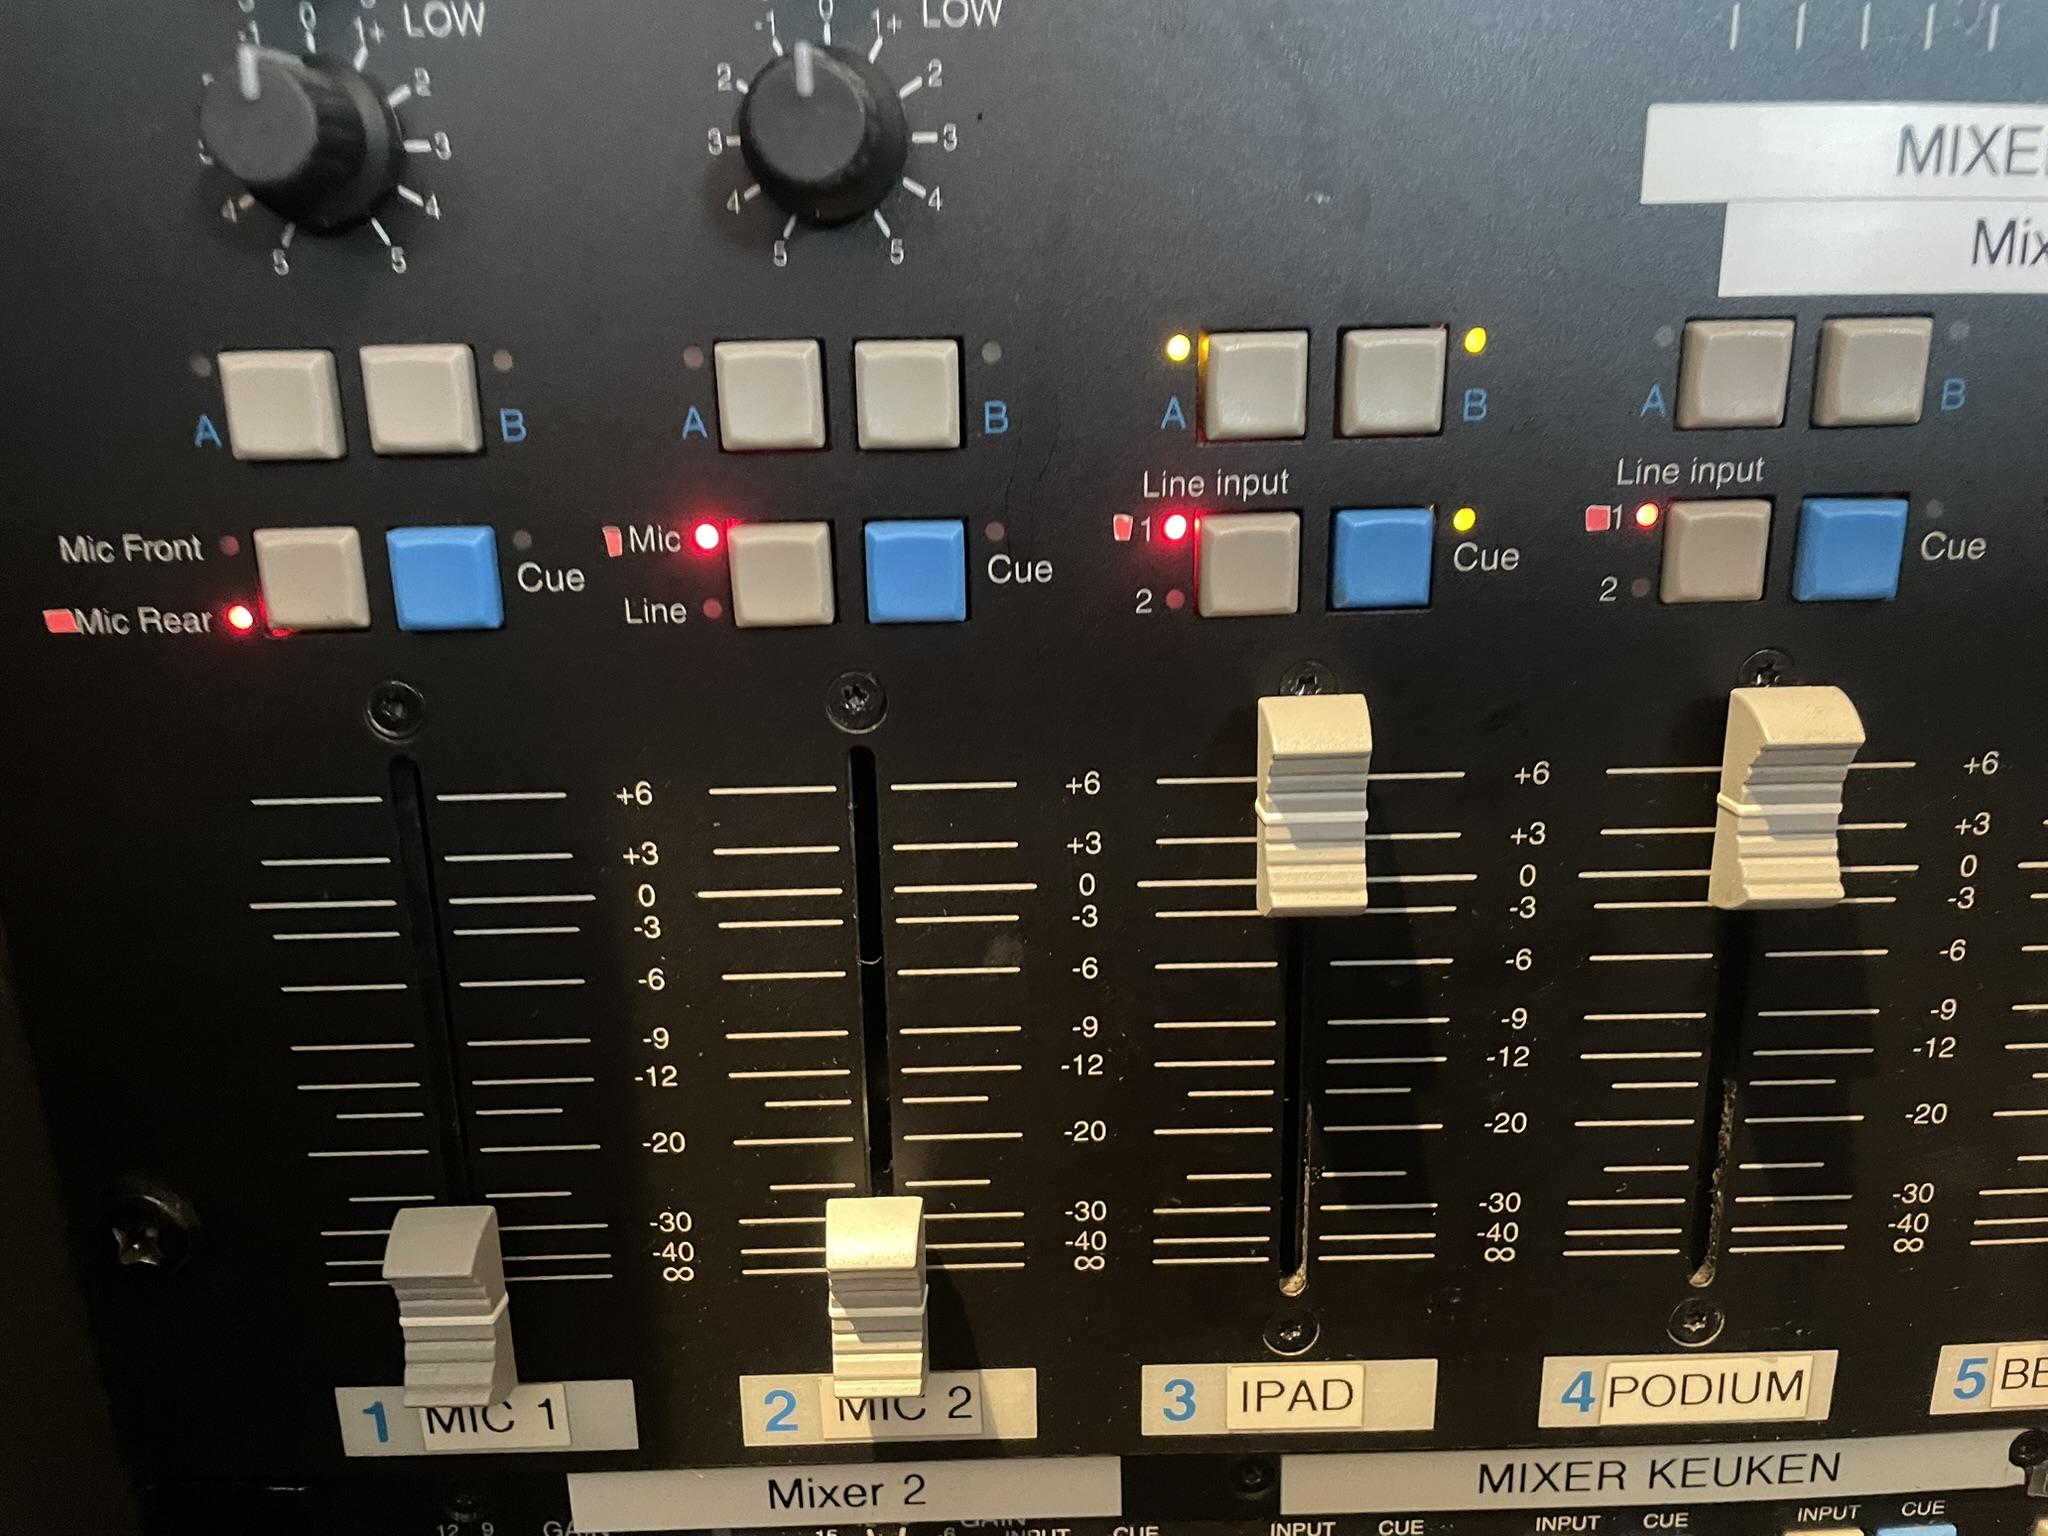
- In the panel slide the corresponding slider up (not too high in order to not hit the limiter when testing)
- Press the button labeled A or B above the slider depending on which side of the bar the microphone will be used
- Turn on the microphone using the power button on the microphone itself (check the batteries if it doesn't work)
- Test the microphone and adjust to the desired sound level
After using the microphones:
- Turn off the microphone using the power button on the microphone itself
- In the panel slide the corresponding slider all the way down
- Deactivate the button labeled A or B above the sound slider
- Put the microphone back in its corresponding spot in the door next to the panel
Sound limiter
- When music or sound from the microphone exceeds 82 decibels, the sound limiter will be hit. This will severly lower all sound output.
- The music coming from the ipad will never hit the limiter (if nobody tempered with anything they shouldn't), but the sound from the microphones can still easily exceed the limit. This is why it's important that the microphones are set up correctly when using them.
- If the limiter is hit, it should go back to normal after a few minutes
- If you notice the music level suddenly being very low, also check the ipad's sound level. Sometimes the ipad lowers its own volume by itself for no reason.
Meteor
Music
- The music is played via Spotify on the Ipad behind the bar. If you want to play a song, ask the SVH to unlock the ipad for you.
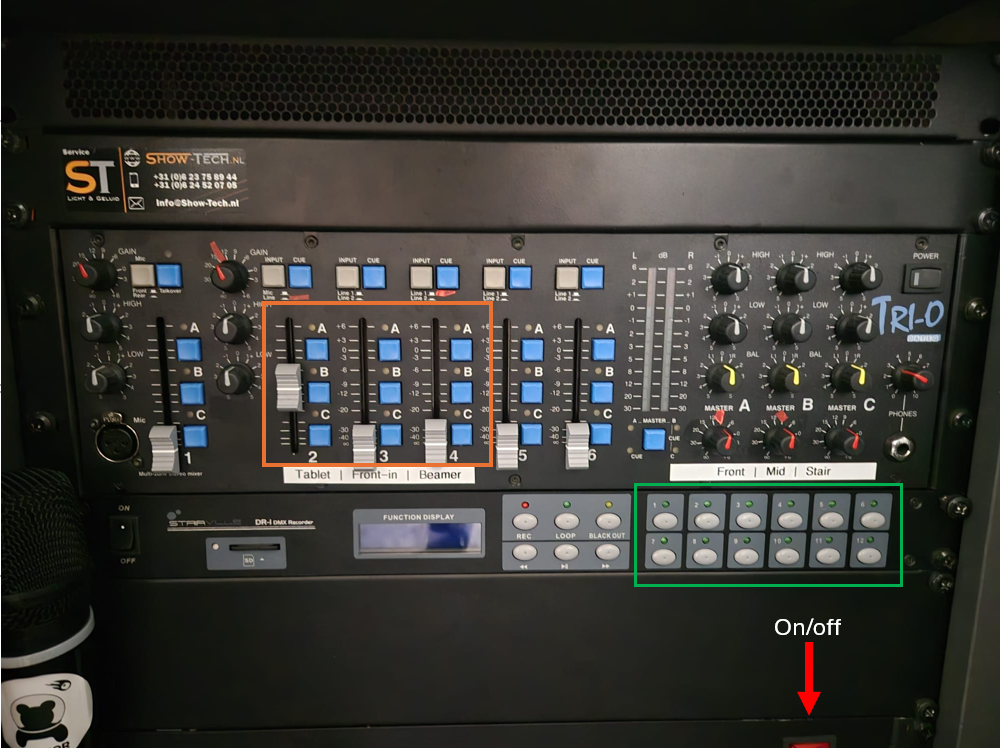
- The level of the sound is determined by the sliders in the orange part. The fader labeled tablet is used for the spotify.
- If something is wrong with the sound, check if all turning knobs are aligned with the tapes, as well as the LEDs.
- When a presentation/pubquiz/ etc is happening, it can be nice to turn of music on that side of the bar. All sound inputs can be turned on seperately for side A(water), side B (low tables) and side C (there are no speakers here yet will be around the stairs). On the picture above you can see that tablet is on on both sides, and all other inputs are turned off.
Lights
Beamer
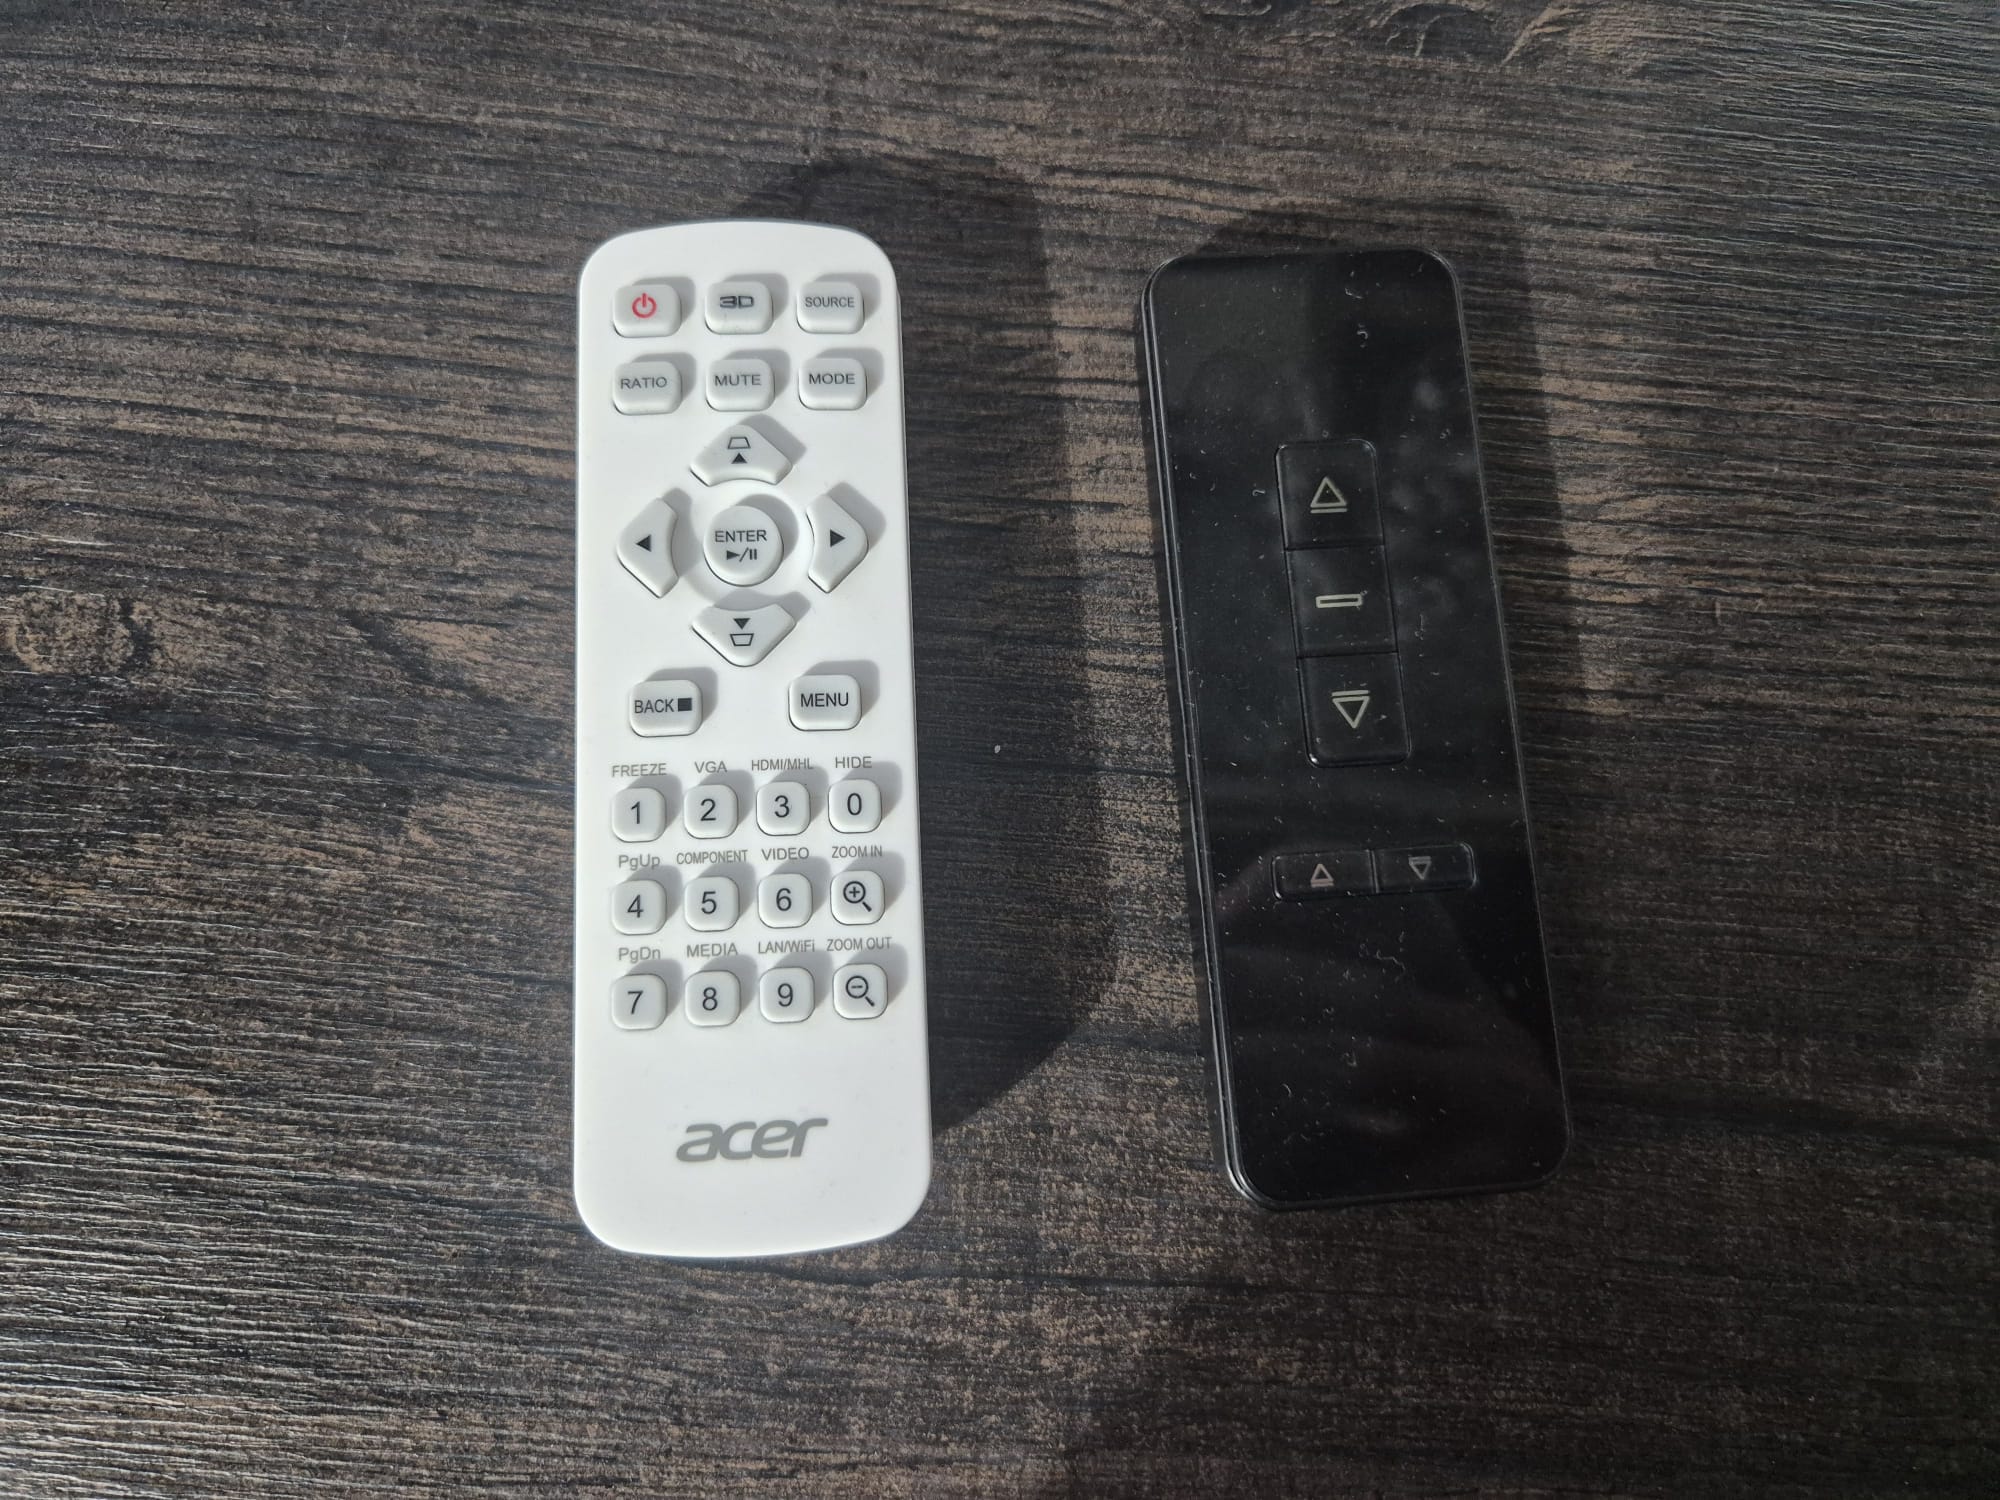
In Meteor we have a projector with a screen which needs to be lowered via the remote control. The white remote is used to turn the beamer on and of, and the black one is used to lower the projection screen.
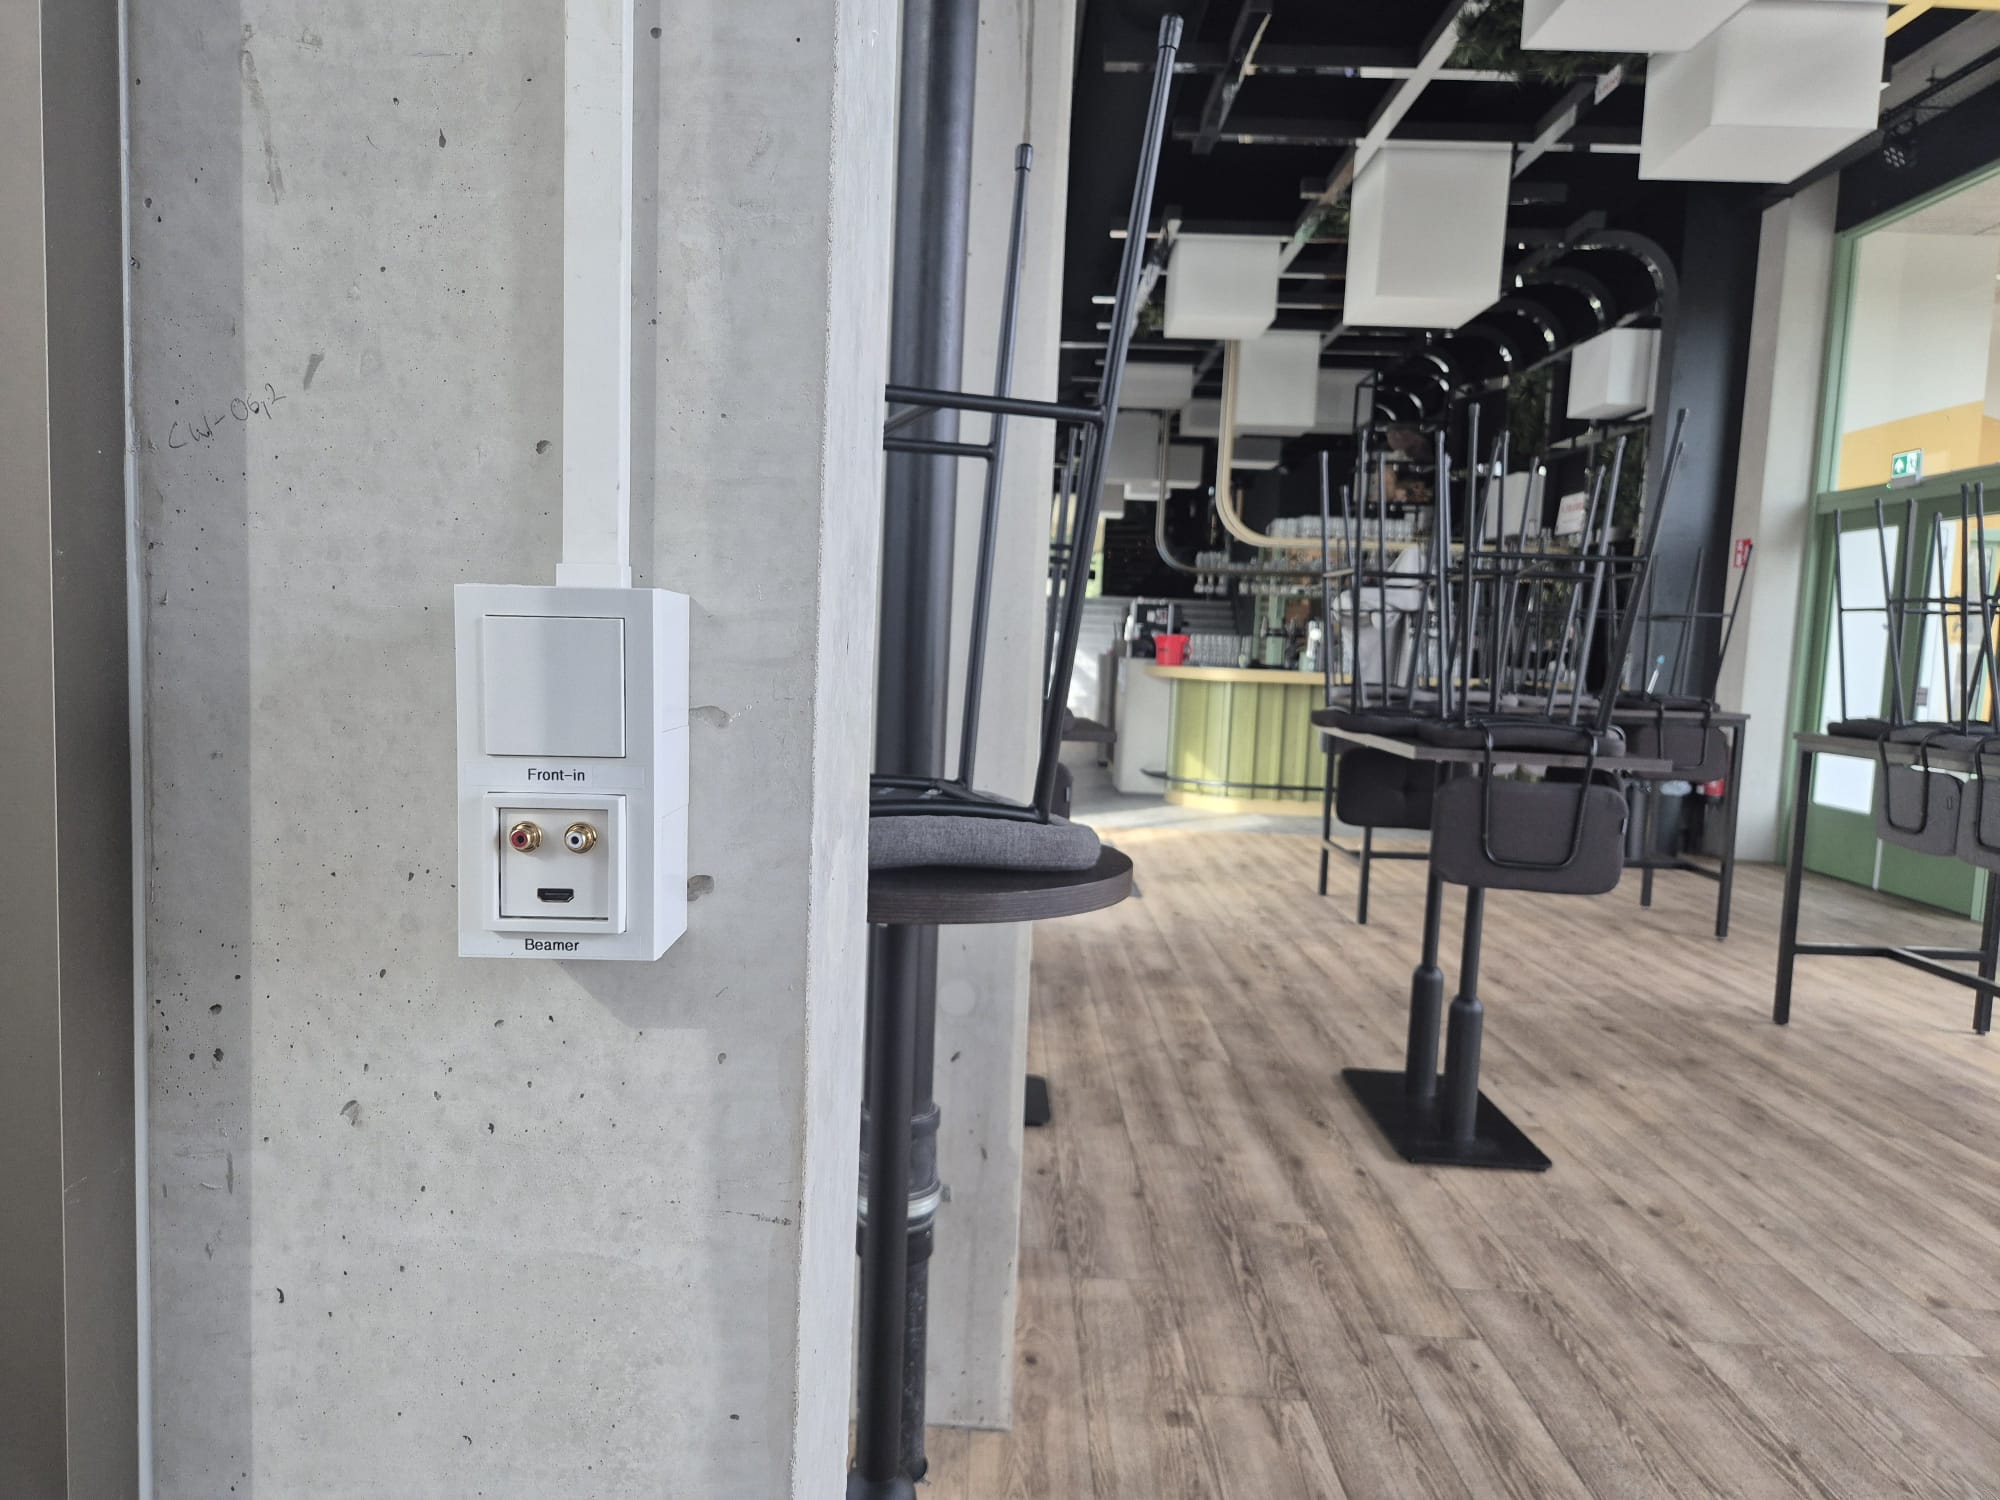
On the side of the water there is a HDMI port which leads to the projector. Press the switch button to activate the input.
Traditions
[Coming Soon]
- Someones birthday
- Boardmember that receives their diploma
- (old) boardies)